..continued from Fortnite Chest Simulator Part 1.
Moving on to the visuals for the chest simulator I knew there were a few things I wanted to achieve. The first being that I wanted to make sure there was a graphical representation of the differences of choice that the generator made. I also wanted to have it randomise the placement of the loot it was distributing and finally I did not want to use animation.
The animation thing was purely a decision made on the fact that I detest doing animation, its not that I find it hard or difficult but more time consuming and sometimes it takes a lot to get a simple results. I also did not want to try and engineer an animation system that dealt with the randomness I wanted to achieve. There was also the added extra consideration that the chests might not be placed on perfectly flat ground so at some point, even if I did use animations, physics was going to have to take over.

So looking back on my prototyping stage I had already made a few decisions, one was to find an asset pack to use for the graphical representations, and another was to look at explosive impulses in Unity. So I started with the asset pack investigations.
I actually have a project that just has all the asset packs I own or have obtained through the last couple of years, it functions like a library for me so I can quickly find and visualise what I am looking for. Now obviously I needed lots and lots of guns and for once my asset library did not come through for me, I just did not have the abundance of guns I needed. So I went looking in my usual places, itch.io, Kenney Assets and the Synty Store. Now there are plenty of assets here but as I was browsing through, trying to collate what I could use I had a small brainwave.
I already had the data I needed to decide what was being pulled out of the chest, and I was storing this as a string. So why could I not just utilise this in some way within the game and create an object I could attached physics to? Obviously in order to do this I would have to utilise the UI Canvas aspect of Unity, but I would need to put the canvas into the world space. When I did this however the text became really poorly rendered so I did some research and found this video from when the World Space canvas was added in to the engine.
Starting from 2 minutes in there is some wonderful advice and tips about positioning and scaling the world space canvas, the key aspect here being scaling the canvas rather than resizing. This allows for the contents of the canvas to retain their original scale, meaning that text does not become an unmanageable 1px size.
Now that I had readable text I just needed to give it physics, I knew it would not be a good idea to give the canvas itself physics so I decide to place the canvas inside an empty game object and then add the physics to this. This resulted in the following

Now I had a game object that I could manipulate with physics and that contained a world space canvas that I could change the text aspect of to the string name of the chosen weapon. As you can see from the image above I also put a light into the object, this was precautionary just in case I need to change the colour of something at a later time. I actually did end up using this light in the code, along with changing the colour of the text dependent on its role, rarity and type.
I created a prefab of this item and added it to the Chest Manager script as a game object I could instantiate. This was the next thing to tackle, how to spawn these items in but I realised it would be best to work out how to move them around before I tried to get multiple versions of them spawning in at once.
This is where the fun begins. I first attempted to just use a regular AddForce method to the rigidbody where I randomised the Vector3 position in the world coordinates around a central point. This would mean that all the objects would spawn in the same place and then I would pick a point just outside this point, at random, to add the force from and throw the objects out of the chest.
Well it worked but it was extremely buggy. I had objects colliding with each other and shooting off in every direction, including out of view. I had objects all going the same way due to the randomness of it. Basically I was not happy with the result. So I went back to my original prototype idea of AddExplosiveForce.
This method simulates an explosion at a point and its effect on the object you are telling it to interact with. So if for example you had an object at x = 1, y = 1 and z = 1 and you applied explosive force to it from x = 0, y = 0 and z = 0 this would be as if the explosion had happened just below the object and offset from its own center point. So it would throw it off in direction up in to the air.
Now this was perfect for what I wanted but I still had two problems. One the objects were all spawning in the same point so therefore any force I add to them would have the same effect on all objects, and two, it would be the same every time I ran it.
The solution for this was quite easy. First I create 4 spawnpoints around the centre point of the chest, I would step through an array of these spawnpoint and spawn an object on each one. Next was to put all of the spawnpoints into a parent object that was position where I was going to simulate the explosion force.
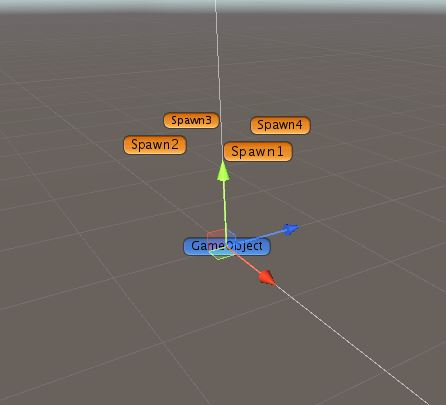
What this allowed me to do was spawn in the 4 objects that I needed and push them all off in different directions as this is how the explosion would add force to them. Then to create an extra level of randomness I changed the rotation of the GameObject at random, as the spawnpoints are children of this object that meant that they would change position every time my function ran. This meant that I had managed to achieve my goal of not using animation and also ejecting the items in random directions every time it ran.
Below is the code I used to rotate the main GameObject and also the script I ran on each instantiated object in order to throw it out of the chest.
|
1 2 |
Quaternion target = Quaternion.Euler(SpawnpointContainer.transform.rotation.x, Random.Range(0f,360f), SpawnpointContainer.transform.rotation.z); SpawnpointContainer.transform.rotation = target; |
|
1 2 3 4 5 6 7 8 9 10 11 12 13 14 |
public class ForcePush : MonoBehaviour { public float explosionForce; public Vector3 explosionCenterPosition; public float explosionRadius; void Start() { Rigidbody prefabRB = GetComponent<Rigidbody>(); prefabRB.AddExplosionForce(explosionForce, explosionCenterPosition, explosionRadius); } } |
One thing I did have to do in order to make this work was considerably shrink the size of the BoxCollider that is attached to the instantiated objects. This was just to ensure they did not collide with each other.
Next was to compile it all together into a working example that allowed for the objects to be decided, then to had the objects change colour dependent on the decision, then to spawn the items, then to throw them out.
This is what I ended up with.
|
1 2 3 4 5 6 7 8 9 10 11 12 13 14 15 16 17 18 19 20 21 22 23 24 25 26 27 28 29 30 31 32 33 34 35 36 37 38 39 40 41 42 43 44 45 46 47 48 49 50 51 52 53 54 55 56 57 58 59 60 61 62 63 64 65 66 67 68 69 70 71 72 73 74 75 76 77 78 79 80 81 82 83 84 85 86 87 88 89 90 91 92 93 94 95 96 97 98 99 100 101 102 103 104 105 106 107 108 109 110 111 112 113 114 115 116 117 118 119 120 121 122 123 124 125 126 127 128 129 130 131 132 133 134 135 136 137 138 139 140 141 142 143 144 145 146 147 148 149 150 151 152 153 154 155 156 157 158 159 160 161 162 163 164 165 166 167 168 169 170 171 172 173 174 175 176 177 178 179 180 181 182 183 184 185 186 187 188 189 190 191 192 193 194 195 196 197 198 199 200 201 202 203 204 205 206 207 208 209 210 211 212 213 214 215 216 217 218 219 220 221 222 223 224 225 226 227 228 229 230 231 232 233 234 235 236 237 238 239 240 241 242 243 244 245 246 247 248 249 250 251 252 253 254 255 256 257 258 259 260 261 262 263 264 265 266 267 268 269 270 271 272 273 274 275 276 277 278 279 280 281 282 283 284 285 286 287 288 289 290 291 292 293 294 295 296 297 298 299 300 301 |
using System.Collections; using System.Collections.Generic; using UnityEngine; using UnityEngine.UI; using UnityEngine.SceneManagement; public class ChestManager2 : MonoBehaviour { [Header("Chest Spawn Stuff")] public GameObject[] Spawnpoints; public GameObject ItemPrefab; public GameObject SpawnpointContainer; [Header("Rarity")] public string s_Rarity; public int i_Rarity; [Header("Weapon Group")] public string s_WeaponGroup; public int i_WeaponGroup; [Header("Weapon Choice")] // 0 = Small, 1 = Medium, 2 = Shotgun Shells, 3 = Large, 4 = Rockets public string s_WeaponChoice; public int i_WeaponChoice; [Header("Ammo Type")] public string s_Ammotype; public int i_AmmoType; [Header("Healing Item")] public string s_HealingItem; public int i_HealingItem; [Header("Utility Item")] public string s_UtilityItem; public int i_UtilityItem; [Header("Weapon Arrays")] public string[] Pistols; public string[] Rifles; public string[] Shotguns; public string[] SMGs; public string[] Snipers; public string[] Explosives; [Header("UX Stuff")] public Text ChestsOpened; public Text CurrentRarity, CurrentWeapon, CurrentAmmo, CurrentHealth, CurrentUtility; private int i_ChestsOpened; void Start() { //Change the world gravity Physics.gravity = new Vector3(0, -20.0F, 0); //Rotate the game object Quaternion target = Quaternion.Euler(SpawnpointContainer.transform.rotation.x, Random.Range(0f,360f), SpawnpointContainer.transform.rotation.z); SpawnpointContainer.transform.rotation = target; //COMMENCE THE SPAWNING StartCoroutine(SpawnChests()); } // Update is called once per frame void Update() { if (Input.GetMouseButtonDown(0)) { Scene scene = SceneManager.GetActiveScene(); SceneManager.LoadScene(scene.name); } } IEnumerator SpawnChests() { //Generates the contents StartCoroutine(GenerateAll()); //Spawns and colours the contents for (int i = 0; i < Spawnpoints.Length; i++) { GameObject clone = Instantiate(ItemPrefab, Spawnpoints[i].transform.position , Quaternion.identity); if (i == 0){ clone.GetComponentInChildren<Text>().text = s_WeaponChoice; if (i_Rarity == 1) { clone.GetComponentInChildren<Light>().color = new Color(23, 255, 0, 255); clone.GetComponentInChildren<Text>().color = new Color(0, 255, 0, 255); } else if (i_Rarity == 2) { clone.GetComponentInChildren<Light>().color = new Color(0, 55, 255, 255); clone.GetComponentInChildren<Text>().color = new Color(0, 55, 255, 255); } else if (i_Rarity == 3) { clone.GetComponentInChildren<Light>().color = new Color(166, 0, 209, 255); clone.GetComponentInChildren<Text>().color = new Color(166, 0, 209, 255); } else if (i_Rarity == 4) { clone.GetComponentInChildren<Light>().color = new Color(255, 146, 0, 255); clone.GetComponentInChildren<Text>().color = new Color(255, 146, 0, 255); } else { clone.GetComponentInChildren<Light>().color = new Color(255, 255, 255, 255); } } else if (i == 1) { clone.GetComponentInChildren<Text>().text = s_Ammotype; clone.GetComponentInChildren<Light>().color = new Color(130, 130, 130, 255); clone.GetComponentInChildren<Text>().color = new Color(130, 130, 130, 255); } else if (i == 2) { clone.GetComponentInChildren<Text>().text = s_HealingItem; clone.GetComponentInChildren<Light>().color = new Color(255, 0, 54, 255); clone.GetComponentInChildren<Text>().color = new Color(255, 0, 0, 255); } else { clone.GetComponentInChildren<Text>().text = s_UtilityItem; clone.GetComponentInChildren<Light>().color = new Color(255, 239, 52, 255); clone.GetComponentInChildren<Text>().color = new Color(255, 255, 0, 255); } yield return new WaitForSeconds (0.1f); } } IEnumerator GenerateAll() { GenerateRarity(); GenerateWeaponTypeGroup(); GenerateWeaponChoice(); GenerateHealing(); Generateutility(); yield return new WaitForEndOfFrame (); } public void PressButton() { StartCoroutine(GenerateAll()); i_ChestsOpened++; } void GenerateRarity () { //Rarities = 0 - Common 50%, 1 - Uncommon 20%, 2 - Rare 15 %, 3 - Epic 10%, 4 - Legendary 5% float tempRarity = Random.Range(0, 100); if (tempRarity <= 50){ i_Rarity = 0; s_Rarity = "Common"; } else if (tempRarity > 50 && tempRarity <= 70) { i_Rarity = 1; s_Rarity = "Uncommon"; } else if (tempRarity > 70 && tempRarity <= 85) { i_Rarity = 2; s_Rarity = "Rare"; } else if (tempRarity > 85 && tempRarity <= 95) { i_Rarity = 3; s_Rarity = "Epic"; } else { i_Rarity = 4; s_Rarity = "Legendary"; } } void GenerateWeaponTypeGroup() { //Weapon Groups = 0 - Pistols 15%, 1 - Rifles 25%, 2 - Shotguns 25%, 3 - SMGs 15%, 4 - Snipers 10%, 5 - Explosives 10% float tempWeaponGroup = Random.Range(0, 100); if (tempWeaponGroup <= 15){ i_WeaponGroup = 0; s_WeaponGroup = "Pistols"; i_AmmoType = 0; s_Ammotype = "Small Ammo"; } else if (tempWeaponGroup > 15 && tempWeaponGroup <= 40) { i_WeaponGroup = 1; s_WeaponGroup = "Rifles"; i_AmmoType = 1; s_Ammotype = "Medium Ammo"; } else if (tempWeaponGroup > 40 && tempWeaponGroup <= 65) { i_WeaponGroup = 2; s_WeaponGroup = "Shotguns"; i_AmmoType = 2; s_Ammotype = "Shotgun Shells"; } else if (tempWeaponGroup > 65 && tempWeaponGroup <= 80) { i_WeaponGroup = 3; s_WeaponGroup = "SMGs"; i_AmmoType = 0; s_Ammotype = "Small Ammo"; } else if (tempWeaponGroup > 80 && tempWeaponGroup <= 90) { i_WeaponGroup = 4; s_WeaponGroup = "Snipers"; i_AmmoType = 3; s_Ammotype = "Large Ammo"; } else { i_WeaponGroup = 5; s_WeaponGroup = "Explosives"; i_AmmoType = 4; s_Ammotype = "Rockets"; } } void GenerateWeaponChoice() { int tempWeaponChoice; switch (i_WeaponGroup){ case 0: tempWeaponChoice = Random.Range (0, Pistols.Length); i_WeaponChoice = tempWeaponChoice; s_WeaponChoice = Pistols[tempWeaponChoice]; break; case 1: tempWeaponChoice = Random.Range (0, Rifles.Length); i_WeaponChoice = tempWeaponChoice; s_WeaponChoice = Rifles[tempWeaponChoice]; break; case 2: tempWeaponChoice = Random.Range (0, Shotguns.Length); i_WeaponChoice = tempWeaponChoice; s_WeaponChoice = Shotguns[tempWeaponChoice]; break; case 3: tempWeaponChoice = Random.Range (0, SMGs.Length); i_WeaponChoice = tempWeaponChoice; s_WeaponChoice = SMGs[tempWeaponChoice]; break; case 4: tempWeaponChoice = Random.Range (0, Snipers.Length); i_WeaponChoice = tempWeaponChoice; s_WeaponChoice = Snipers[tempWeaponChoice]; break; case 5: tempWeaponChoice = Random.Range (0, Explosives.Length); i_WeaponChoice = tempWeaponChoice; s_WeaponChoice = Explosives[tempWeaponChoice]; break; } } void GenerateHealing() { //Healing Items = 0 - Health Pack 15%, 1 - Bandages 25%, 2 - Mini Sheild 25%, 3 - Full Shield 15%, 4 - Chug Splash 10%, 5 - Chug Jug 10% float tempHealingItem = Random.Range(0, 100); if (tempHealingItem <= 15){ i_HealingItem = 0; s_HealingItem = "Health Pack"; } else if (tempHealingItem > 15 && tempHealingItem <= 40) { i_HealingItem = 1; s_HealingItem = "Bandages"; } else if (tempHealingItem > 40 && tempHealingItem <= 65) { i_HealingItem = 2; s_HealingItem = "Mini Shield"; } else if (tempHealingItem > 65 && tempHealingItem <= 80) { i_HealingItem = 3; s_HealingItem = "Full Shield"; } else if (tempHealingItem > 80 && tempHealingItem <= 90) { i_HealingItem = 4; s_HealingItem = "Chug Splash"; } else { i_HealingItem = 5; s_HealingItem = "Chug Jug"; } } void Generateutility () { //Utils = 0 - Gold 50%, 1 - Grapple Gun 20%, 2 - Grenades 15 %, 3 - Crash Pads 10%, 4 - Launchpad 5% float tempUtility = Random.Range(0, 100); if (tempUtility <= 50){ i_UtilityItem = 0; s_UtilityItem = "Gold"; } else if (tempUtility > 50 && tempUtility <= 70) { i_UtilityItem = 1; s_UtilityItem = "Grapple Gun"; } else if (tempUtility > 70 && tempUtility <= 85) { i_UtilityItem = 2; s_UtilityItem = "Grenades"; } else if (tempUtility > 85 && tempUtility <= 95) { i_UtilityItem = 3; s_UtilityItem = "Crash Pads"; } else { i_UtilityItem = 4; s_UtilityItem = "Launchpad"; } } } |
So this script above combined with the ForcePush script further up this post produced my final result, it looked like this.

So now I had two versions of my prototype, one that just handled the mathematics and another that used these mathematics to feed into a visual representation.
Overall I am really happy with what I created, its not an exact recreation but it has given me an insight into the thought processes that were probably required in the actual creation of this mechanic.
Oh and you can play this version of the simulator here https://defconsoft.itch.io/fortnite-chest-simulator-2
References
itch.io. 2021. Top free game assets. [online] Available at: <https://itch.io/game-assets/free> [Accessed 15 June 2021].
Kenney.nl. 2021. Kenney • Home. [online] Available at: <https://www.kenney.nl/> [Accessed 15 June 2021].
Synty Store. 2021. Synty Store – 3D Art for games (Unity + Unreal). [online] Available at: <https://syntystore.com/> [Accessed 15 June 2021].
Youtube.com. 2021. Unity 4.6 – New UI World Space Canvas. [online] Available at: <https://www.youtube.com/watch?v=Mzt1rEEdeOI> [Accessed 15 June 2021].
Technologies, U., 2021. Unity – Scripting API: Rigidbody.AddExplosionForce. [online] Docs.unity3d.com. Available at: <https://docs.unity3d.com/ScriptReference/Rigidbody.AddExplosionForce.html> [Accessed 15 June 2021].
Figures
Feature Image: FortniteIntel, 2019. Fortnite chest graphic. [image] Available at: <https://fortniteintel.com/wp-content/uploads/2019/03/chest.jpg> [Accessed 19 June 2021].
Figure 1: Charlish, R (2021) ‘Idea Generation’ Created on 22nd June 2021
Figure 2: Charlish, R (2021) ‘Item prefab in inspector’ Created on 22nd June 2021
Figure 3: Charlish, R (2021) ‘Spawnpoints in world space’ Created on 22nd June 2021
Figure 4: Charlish, R (2021) ‘Final Prototype’ Created on 22nd June 2021


0 Comments