For the Indie Game Start-up project I worked as a solo developer on a title called Just Shoot. The following blog post(s) are a documentary of how the game and supporting materials were created.
NB: This is not an exhaustive examination of everything I did for this prototype. A lot of things created for this prototype I had previous experience of so I am going to concentrate on the new knowledge that I obtained.
Starting the Prototype
The prototype started during the creation of the business plan for this module. I wanted to ensure that I could at least get the basics in place before committing to this project within the first part of this assignment. During this time I put together the project management for building the prototype as the Pre-production aspects of the plan.

At this early stage there was still a lot of planning to do so the project management really was only in place to act as a map for the creation of the prototype. Thankfully it was pretty accurate in what I needed to create in order to produce the final prototype for this aspect of the module so I used it as a to do list for the creation.
Throughout the building of the prototype I either created or utilised asset packs in order to create every aspect you see in the final game. I do not profess in anyway to be an artist so nearly everything, except the UI, was implemented through the use of asset packs and I was very reliant on assets produced by Synty, something I already had in my possession as I find their asset packs to be incredibly useful.
The Player
The most important part of the prototype, and something I started on straight away, was to make sure I was able to create the third person controller and be able to give it the animations that I required. I downloaded the Unity Starter Asset Third Person Controller pack and began to see what I could use from it.

The first issue I discovered with this controller was that the character does not really move like most third person shooters. Essentially in most modern day third person shooter games, Fortnite and PUBG for example, the character tends to strafe around rather than turn their whole body something the Starter Assets did not do. So I delved into the controller code to see if I could get it working like this. I had some limited success but then I stumbled across a great tutorial video by Code Monkey (2021) that implemented exactly what I wanted within the Starter Asset scripts. By simply adding in a bool to check whether the character can rotate you can manipulate this action with an if statement to allow the character to rotate.
|
1 2 3 4 5 6 7 8 9 10 11 12 13 14 15 16 17 18 19 20 |
private void Move() { <--CODE SNIPPED--> // note: Vector2's != operator uses approximation so is not floating point error prone, and is cheaper than magnitude // if there is a move input rotate player when the player is moving if (_input.move != Vector2.zero) { _targetRotation = Mathf.Atan2(inputDirection.x, inputDirection.z) * Mathf.Rad2Deg + _mainCamera.transform.eulerAngles.y; float rotation = Mathf.SmoothDampAngle(transform.eulerAngles.y, _targetRotation, ref _rotationVelocity, RotationSmoothTime); // rotate to face input direction relative to camera position if (_rotateOnMove) { transform.rotation = Quaternion.Euler(0.0f, rotation, 0.0f); } } } public void SetRotateOnMove (bool newRotateOnMove) { _rotateOnMove - newRotateOnMove; } |
I decide to continue working through this tutorial to see if I could get the character working completely by just using this resource but once I was done the character worked but did not feel right for me. So I went looking to see if anyone had approached this in a different way, especially with regards to adding in animation rigging.
Thankfully I found an incredible resource from The Kiwi Coder (2021) which was a series of videos that incorporated the Third Person controller with animation rigging tutorials which was exactly what I needed. I followed through these tutorials in order to learn what I could and quickly realised that I could implement all of the player mechanics that I needed through these tutorials with a few alterations to fit exactly what I need. I was also able to re-purpose the Standard Asset animations with my chosen character (male Sci Fi models from the Synty Sci Fi City pack).
Below are the final Character Locomotion and Character Aiming scripts that are used to control the player and aim the players weapon, and the resultant inspector elements these scripts create.
|
1 2 3 4 5 6 7 8 9 10 11 12 13 14 15 16 17 18 19 20 21 22 23 24 25 26 27 28 29 30 31 32 33 34 35 36 37 38 39 40 41 42 43 44 45 46 47 48 49 50 51 52 53 54 55 56 57 58 59 60 61 62 63 64 65 66 67 68 69 70 71 72 73 74 75 76 77 78 79 80 81 82 83 84 85 86 87 88 89 90 91 92 93 94 95 96 97 98 99 100 101 102 103 104 105 106 107 108 109 110 111 112 113 114 115 116 117 118 119 120 121 122 |
using System.Collections; using System.Collections.Generic; using UnityEngine; public class CharacterLocomotion : MonoBehaviour { public float jumpHeight; public float gravity; public float stepDown; public float airControl; public float jumpDamp; public float groundSpeed; public float pushPower; Animator animator; CharacterController characterController; Vector2 input; Vector3 rootMotion; Vector3 velocity; bool isJumping; // Start is called before the first frame update void Start() { animator = GetComponent<Animator>(); characterController = GetComponent<CharacterController>(); } // Update is called once per frame void Update() { input.x = Input.GetAxis("Horizontal"); input.y = Input.GetAxis("Vertical"); animator.SetFloat("InputX", input.x); animator.SetFloat("InputY", input.y); if (Input.GetKeyDown(KeyCode.Space)) { Jump(); } } private void OnAnimatorMove(){ rootMotion += animator.deltaPosition; } private void FixedUpdate() { if (isJumping){ //Inair UpdateInAir(); } else{ //Isgrounded UpdateOnGround(); } } private void UpdateOnGround() { Vector3 stepForwardAmount = rootMotion * groundSpeed; Vector3 stepDownAmount = Vector3.down * stepDown; characterController.Move(stepForwardAmount + stepDownAmount); rootMotion = Vector3.zero; if (!characterController.isGrounded) { SetInAir(0); } } private void UpdateInAir(){ velocity.y -= gravity * Time.fixedDeltaTime; Vector3 displacement = velocity * Time.fixedDeltaTime; displacement += CalculateAirControl(); characterController.Move(displacement); isJumping = !characterController.isGrounded; rootMotion = Vector3.zero; animator.SetBool("isJumping", isJumping); } Vector3 CalculateAirControl(){ return ((transform.forward * input.y) + (transform.right * input.x)) * (airControl / 100); } void Jump() { if (!isJumping) { float jumpVelocity = Mathf.Sqrt(2 * gravity * jumpHeight); SetInAir(jumpVelocity); } } private void SetInAir(float jumpVelocity) { isJumping = true; velocity = animator.velocity * jumpDamp * groundSpeed; velocity.y = jumpVelocity; animator.SetBool("isJumping", true); } void OnControllerColliderHit(ControllerColliderHit hit) { Rigidbody body = hit.collider.attachedRigidbody; // no rigidbody if (body == null || body.isKinematic) return; // We dont want to push objects below us if (hit.moveDirection.y < -0.3f) return; // Calculate push direction from move direction, // we only push objects to the sides never up and down Vector3 pushDir = new Vector3(hit.moveDirection.x, 0, hit.moveDirection.z); // If you know how fast your character is trying to move, // then you can also multiply the push velocity by that. // Apply the push body.velocity = pushDir * pushPower; } } |
|
1 2 3 4 5 6 7 8 9 10 11 12 13 14 15 16 17 18 19 20 21 22 23 24 25 26 27 28 29 30 31 32 33 34 35 36 37 38 39 40 41 42 43 44 45 46 47 48 49 50 51 52 53 54 55 56 |
using System.Collections; using System.Collections.Generic; using UnityEngine; using UnityEngine.Animations.Rigging; using Cinemachine; public class CharacterAiming : MonoBehaviour { public float turnSpeed; public float aimDuration; Camera mainCamera; public Transform cameraLookAt; public CinemachineVirtualCamera aimVirtualCamera; public Cinemachine.AxisState xAxis; public Cinemachine.AxisState yAxis; public Rig aimLayer; // Start is called before the first frame update void Start() { mainCamera = Camera.main; Cursor.visible = false; Cursor.lockState = CursorLockMode.Locked; } // Update is called once per frame void FixedUpdate() { xAxis.Update(Time.fixedDeltaTime); yAxis.Update(Time.fixedDeltaTime); cameraLookAt.eulerAngles = new Vector3 (yAxis.Value, xAxis.Value, 0); float yawCamera = mainCamera.transform.rotation.eulerAngles.y; transform.rotation = Quaternion.Slerp(transform.rotation, Quaternion.Euler(0, yawCamera, 0), turnSpeed * Time.fixedDeltaTime); } void Update() { if (Input.GetButton("Fire2")) { aimVirtualCamera.gameObject.SetActive(true); xAxis.m_MaxSpeed = 150f; yAxis.m_MaxSpeed = 150f; } else { aimVirtualCamera.gameObject.SetActive(false); xAxis.m_MaxSpeed = 300f; yAxis.m_MaxSpeed = 300f; } aimLayer.weight = 1.0f; } } |

As you can see from the image above there was also the small matter of building a rig controller for the character and also creating a weapon that attached to different aspects of the rig. I learned a lot from following these tutorials, especially surrounding character rigging and animation as I had not really explored these before, however the most exciting thing I discovered was a way to create animations using this Rig Builder at runtime. By creating a function within the script you can save out an animation clip, this was utilised to create the different weapon pose animations depending on whatever gun was in the players hand. All I needed to do was run the game and place the weapon onto the player, I could then use the Rig Builder and associated rig constraints to pose the player so that they were holding the gun correctly and save out the final pose as an animation that I could then use in the animation controller to using layer weights to animate the player holding different weapons.
|
1 2 3 4 5 6 7 8 9 10 11 |
[ContextMenu("Save weapon pose")] void SaveWeaponPose() { GameObjectRecorder recorder = new GameObjectRecorder(gameObject); recorder.BindComponentsOfType<Transform>(weaponParent.gameObject, false); recorder.BindComponentsOfType<Transform>(weaponLeftGrip.gameObject, false); recorder.BindComponentsOfType<Transform>(weaponRightGrip.gameObject, false); recorder.TakeSnapshot(0.0f); recorder.SaveToClip(weapon.weaponAnimation); UnityEditor.AssetDatabase.SaveAssets(); } |
What this essentially also allowed me to do was create a weapon prefab that could then be repurposed for different weapons and just assign new poses to it, meaning that if I was to add in lots of weapons (which is the intention of the game) they could all be built off the one prefab.
With this done, the player was pretty much in its finished state. I was able to add in the animations, the weapons, the UI and a multi-functional camera system that zoomed in on aim. The final player prefab ended up looking like this (the Player Manager script was added in to run the game scripts later on).

I must admit the hardest part of getting the player working was getting the animations re-rigged to fit with the Synty character. I had got a lot of help from an explanation video from iHeartGameDev (2020) titled How to animate characters in Unity 3D | Animation Retargeting Explained to fully understand how the skeletal system and avatar system worked within Unity, and to fully understand how to remap a character avatar in Unity.
I also learned a lot about the rigging systems in both general animation but also within Unity. Brackeys (2020) had a great tutorial outlining the animation rigging system that opened the door to a lot of areas in Unity I had not explored.
The Enemies
There are two types of enemies in Just Shoot, well actually there are three but two of them are built off the same infrastructure just with a different behavior, the flying enemy and the bipedal enemy.

The flying enemy, and its alternative flying enemy building, are standard NavMesh agent enemies that are given a target, the Player, and set off on their merry way to seek out this target and start attacking it. The difference with the flying enemy building is that its target is not the player and instead it find the nearest building target out of an array of targets and moves towards and attack this target instead.
These flying enemies also use a derivative of the AI Weapon script that has been created for the bipedal enemies in order to fire their weapon and inherit the attributes from the main enemy weapon type. This is a little messy and in a full production build I would like to revisit this and build a better class based system than the way I have done it here.
|
1 2 3 4 5 6 7 8 9 10 11 12 13 14 15 16 17 18 19 20 21 22 23 24 25 26 27 28 29 30 31 32 33 34 35 36 37 38 39 40 41 42 43 44 45 46 47 48 49 50 51 52 53 54 55 56 57 58 59 60 61 62 63 64 65 66 67 68 69 70 71 72 73 74 75 76 77 78 79 80 81 82 83 84 85 86 87 88 89 90 91 92 93 94 95 96 97 98 99 100 101 102 103 104 105 106 107 108 109 110 111 112 113 114 115 116 117 118 119 120 121 122 123 124 125 126 127 128 129 130 131 132 |
using System.Collections; using System.Collections.Generic; using UnityEngine; using UnityEngine.AI; public class FlyingEnemy : MonoBehaviour { private NavMeshAgent agent; public Transform playerTransform; float timer = 0.0f; public float maxDistance; public float maxTime; public GameObject deathParticle; AiFlyingWeapon flyingWeapon; public GameObject[] models; public GameObject minimapIcon; public int tempModel; private Transform firePoint; private Transform target; public GameObject healthpack; public GameObject cogPickup; public AudioSource deathFX; public AudioClip[] deathSplodes; bool CanShoot; // Start is called before the first frame update void Start() { playerTransform = GameObject.Find("Player").transform; agent = GetComponent<NavMeshAgent>(); tempModel = Random.Range(0, models.Length); models[tempModel].SetActive(true); firePoint = models[tempModel].transform.GetChild(0); target = GameObject.FindGameObjectWithTag("PlayerHitBox").transform; flyingWeapon = GetComponent<AiFlyingWeapon>(); flyingWeapon.FindWeapon(models[tempModel]); } // Update is called once per frame void Update() { if (!agent.enabled) { return; } timer -=Time.deltaTime; if (!agent.hasPath){ agent.destination = playerTransform.position; } if (timer < 0.0f) { Vector3 direction = (playerTransform.position - agent.destination); direction.y = 0; if (direction.sqrMagnitude > maxDistance * maxDistance) { if (agent.pathStatus != NavMeshPathStatus.PathPartial) { agent.destination = playerTransform.position; } } timer = maxTime; } if (!agent.pathPending) { if (agent.remainingDistance <= agent.stoppingDistance) { if (!agent.hasPath || agent.velocity.sqrMagnitude == 0f) { if (!CanShoot){ flyingWeapon.ActivateWeapon(); CanShoot = true; } } } } else { flyingWeapon.DeactivateWeapon(); CanShoot = false; } Debug.Log (CanShoot); } public IEnumerator DeathEffect(){ flyingWeapon.DeactivateWeapon(); //See if we are in the door event and if we are remove one from the spawned list if (GameObject.Find("TheDoor").GetComponent<DoorEvent>().DoorActive == true) { GameObject.Find("TheDoor").GetComponent<DoorEvent>().spawnedEnemies--; } if (GameObject.Find("BuildingContainer").GetComponent<BuildingEvent>().BuildingActive == true) { GameObject.Find("BuildingContainer").GetComponent<BuildingEvent>().spawnedEnemies--; } agent.enabled = false; deathFX.clip = deathSplodes[Random.Range(0, deathSplodes.Length)]; deathFX.Play(); GameObject.Find("Player").GetComponent<PlayerManager>().damageBoostAmount++; CanShoot = false; flyingWeapon.DeactivateWeapon(); minimapIcon.SetActive(false); deathParticle.SetActive(true); GetComponentInChildren<Canvas>().enabled = false; float temp = Random.Range (0f,1f); GameObject cog = Instantiate (cogPickup, models[tempModel].transform); cog.transform.parent = GameObject.Find("---PickUps----------------------").transform; if (temp > 0.6f){ GameObject hpBox = Instantiate (healthpack, models[tempModel].transform); hpBox.transform.parent = GameObject.Find("---PickUps----------------------").transform; } models[tempModel].SetActive(false); yield return new WaitForSeconds (4.0f); Destroy (this.gameObject); } } |
|
1 2 3 4 5 6 7 8 9 10 11 12 13 14 15 16 17 18 19 20 21 22 23 24 25 26 27 28 29 30 31 32 33 34 35 36 37 38 39 40 41 42 43 44 45 46 47 48 49 50 51 52 53 54 55 56 57 58 59 60 61 62 63 64 65 66 67 68 69 70 71 72 73 74 75 76 77 78 79 80 81 82 83 84 85 86 87 88 89 90 91 92 93 94 95 96 97 98 99 100 101 102 103 104 105 106 107 108 109 110 111 112 113 114 115 116 117 118 119 120 121 122 123 124 125 126 127 128 129 130 131 132 133 134 135 136 137 138 139 140 141 142 143 144 145 146 147 148 149 150 151 152 153 154 155 156 157 158 159 160 161 162 |
using System.Collections; using System.Collections.Generic; using UnityEngine; using UnityEngine.AI; public class FlyingEnemyBuilding : MonoBehaviour { private NavMeshAgent agent; public GameObject[] targets; public List<Transform> targetTransforms; public Transform targetTransform; float timer = 0.0f; public float maxDistance; public float maxTime; public GameObject deathParticle; AiFlyingWeaponBuilding flyingWeapon; public GameObject[] models; public GameObject minimapIcon; public int tempModel; private Transform firePoint; public GameObject healthpack; public GameObject cogPickup; public AudioSource deathFX; public AudioClip[] deathSplodes; bool CanShoot; void Awake() { targets = GameObject.FindGameObjectsWithTag("EnemyTargetPoint"); foreach (GameObject go in targets) { targetTransforms.Add(go.GetComponent<Transform>()); } } // Start is called before the first frame update void Start() { GetClosestEnemy(targetTransforms); //targetTransform = targets[Random.Range(0, targets.Length)].transform; agent = GetComponent<NavMeshAgent>(); tempModel = Random.Range(0, models.Length); models[tempModel].SetActive(true); firePoint = models[tempModel].transform.GetChild(0); flyingWeapon = GetComponent<AiFlyingWeaponBuilding>(); flyingWeapon.FindWeapon(models[tempModel]); models[tempModel].transform.GetChild(0).gameObject.transform.GetChild(0).GetComponent<BuildingWeapon>().RaycastDestination = targetTransform; } //Grabs the closest building target and sets it as target. Transform GetClosestEnemy (List<Transform> enemies) { Transform bestTarget = null; float closestDistanceSqr = Mathf.Infinity; Vector3 currentPosition = transform.position; foreach(Transform potentialTarget in enemies) { Vector3 directionToTarget = potentialTarget.position - currentPosition; float dSqrToTarget = directionToTarget.sqrMagnitude; if(dSqrToTarget < closestDistanceSqr) { closestDistanceSqr = dSqrToTarget; bestTarget = potentialTarget; } } targetTransform = bestTarget; return bestTarget; } // Update is called once per frame void Update() { if (!agent.enabled) { return; } timer -=Time.deltaTime; if (!agent.hasPath){ agent.destination = targetTransform.position; } if (timer < 0.0f) { Vector3 direction = (targetTransform.position - agent.destination); direction.y = 0; if (direction.sqrMagnitude > maxDistance * maxDistance) { if (agent.pathStatus != NavMeshPathStatus.PathPartial) { agent.destination = targetTransform.position; } } timer = maxTime; } if (!agent.pathPending) { if (agent.remainingDistance <= agent.stoppingDistance) { if (!agent.hasPath || agent.velocity.sqrMagnitude == 0f) { if (!CanShoot){ flyingWeapon.ActivateWeapon(); CanShoot = true; } } } } else { flyingWeapon.DeactivateWeapon(); CanShoot = false; } } public IEnumerator DeathEffect(){ //See if we are in the door event and if we are remove one from the spawned list if (GameObject.Find("TheDoor").GetComponent<DoorEvent>().DoorActive == true) { GameObject.Find("TheDoor").GetComponent<DoorEvent>().spawnedEnemies--; } if (GameObject.Find("BuildingContainer").GetComponent<BuildingEvent>().BuildingActive == true) { GameObject.Find("BuildingContainer").GetComponent<BuildingEvent>().spawnedEnemies--; } agent.enabled = false; deathFX.clip = deathSplodes[Random.Range(0, deathSplodes.Length)]; deathFX.Play(); GameObject.Find("Player").GetComponent<PlayerManager>().damageBoostAmount++; CanShoot = false; flyingWeapon.DeactivateWeapon(); minimapIcon.SetActive(false); deathParticle.SetActive(true); GetComponentInChildren<Canvas>().enabled = false; float temp = Random.Range (0f,1f); GameObject cog = Instantiate (cogPickup, models[tempModel].transform); cog.transform.parent = GameObject.Find("---PickUps----------------------").transform; if (temp > 0.6f){ GameObject hpBox = Instantiate (healthpack, models[tempModel].transform); hpBox.transform.parent = GameObject.Find("---PickUps----------------------").transform; } models[tempModel].SetActive(false); yield return new WaitForSeconds (4.0f); Destroy (this.gameObject); } } |
The bipedal enemies are a completely different kettle of fish and required a lot of new knowledge for me to get them implemented. Once again I was able to find a great resource from The Kiwi Coder (2021) where he implements AI enemies using a combination of NavMesh, ragdolls, and inverse kinematics. I followed his tutorials to get an understanding of how this all worked and then he began talking about State Machines. This was completely new to me so I did a little research into what these actually were.
I found a couple of articles regarding state machines but the two I found most useful were State Machine Basics by Unity Technologies (2020) and State Pattern using Unity by Shora (2020). Both of these explain in simple terms what a State Machine is and how it can be used to control the behavior of a character in Unity. Shora goes on to explain that state machines are “… a concept in which a container stores the status of something at any given time. Then, given an input, it can provide an output based on the current state, transitioning to a new state in the process.” With this I decided to create a simple state machine diagram to follow and then ultimately implement into the game.

So in using the state machine process along with the tutorials from the Kiwi Coder I was able to create an enemy that would sit idle until you were within a determined range, it would then switch to chase after you and when it got within a minimum distance range it would start attacking you. If you then extended outside of this minimum range it would switch back to chasing you, recalculating its path every second. When its health dropped to zero it would switch into the death state which would remove its NavMesh agent, switch on the ragdoll effect and allow you to shoot its dead body all over the level until it ultimately disappeared. The final result looks like this.
|
1 2 3 4 5 6 7 8 9 10 11 12 13 14 15 16 17 18 19 20 21 22 23 24 25 26 27 28 29 30 31 32 33 34 35 36 37 38 39 |
using System.Collections; using System.Collections.Generic; using UnityEngine; public class AiStateMachine { public AiState[] states; public AiAgent agent; public AiStateId currentState; public AiStateMachine(AiAgent agent) { this.agent = agent; int numStates = System.Enum.GetNames(typeof(AiStateId)).Length; states = new AiState[numStates]; } public void RegisterState(AiState state) { int index = (int)state.GetId(); states[index] = state; } public AiState GetState(AiStateId stateId) { int index = (int)stateId; return states[index]; } public void Update() { GetState(currentState)?.Update(agent); } public void ChangeState(AiStateId newState) { GetState(currentState)?.Exit(agent); currentState = newState; GetState(currentState)?.Enter(agent); } } |
|
1 2 3 4 5 6 7 8 9 10 11 12 13 14 15 16 17 18 19 20 21 22 23 24 25 26 27 28 29 30 31 32 33 34 35 36 37 38 39 40 41 42 43 44 45 46 |
using System.Collections; using System.Collections.Generic; using UnityEngine; using UnityEngine.AI; public class AiAgent : MonoBehaviour { public AiStateId initialState; public AiAgentConfig config; [HideInInspector] public AiStateMachine stateMachine; [HideInInspector] public NavMeshAgent navMeshAgent; [HideInInspector] public Ragdoll ragdoll; [HideInInspector] public SkinnedMeshRenderer mesh; [HideInInspector] public UIHealthBar ui; [HideInInspector] public Transform playerTransform; [HideInInspector] public AiWeapons weapons; [HideInInspector] public DeathEffect deathEffect; // Start is called before the first frame update void Start() { ragdoll = GetComponent<Ragdoll>(); mesh = GetComponentInChildren<SkinnedMeshRenderer>(); ui = GetComponentInChildren<UIHealthBar>(); navMeshAgent = GetComponent<NavMeshAgent>(); weapons = GetComponent<AiWeapons>(); deathEffect = GetComponent<DeathEffect>(); playerTransform = GameObject.FindGameObjectWithTag("Player").transform; stateMachine = new AiStateMachine(this); stateMachine.RegisterState(new AiChasePlayerState()); stateMachine.RegisterState(new AiDeathState()); stateMachine.RegisterState(new AiIdleState()); stateMachine.RegisterState(new AiAttackPlayerState()); stateMachine.ChangeState(initialState); } // Update is called once per frame void Update() { stateMachine.Update(); } } |
With a little more coding and lot more arguing the enemies finally got finished off with health scripts and health bars, and I also added in some extra elements to their death sequences so that they would spawn items for the player to collect on death such as health packs and currencies.
A lot of the new knowledge here came from the state machine aspects but I was able to add in a lot of the learning I had already gotten from the animation rigging in order to allow the bipedal enemies to look at you and use their eye as a laser weapon. This allowed me to negate a lot of the issues of trying to get the enemy to carry and use a gun.
Once I had the different enemy types create and working I prefabbed them out so that I could use them throughout the level design and in the different set pieces.
The Door
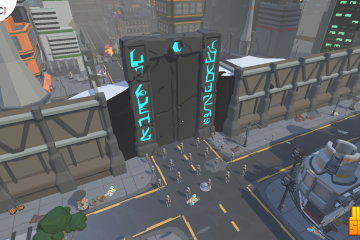
The first of the set pieces I wanted for the game was to illustrate what a mini event would look like in the game. I decided upon returning to one of my most fearsome adversaries that I have ever put in to a game before. The Door!. Yes I know its not exactly intimidating but it creates a great stalling mechanic for the player to have to deal with while all the while being attacked by other enemies. Find a way through the door. For this I wanted the player to have to switch between shooting the door itself and the enemies.

The event itself is pretty simple from a code perspective. The door has a health amount and the player just has to shoot some specific points on the door in order to reduce this health amount. The targets, or weak points, are four game objects that have a particle effect target assigned to them that the game randomly switches on and off over a period of time. Each of these targets have a trigger volume in them that is looking for bullet damage and when it receives some it subtracts it from the doors overall health.
Once the door reaches zero health this is where I wanted to do something special and actually fracture up the model so that the door crumbles away. I recalled a tutorial on how to do this from Code Monkey (2021) where he uses Pro Builder to break up an existing model using the Boolean feature, this creates a broken up version of the model out of several parts. I found this to be quite messy however as you had to be able to break the model apart in a way that you did not overlap any of the newly created models.
Thankfully I had recently purchased a bundle of asset packs which included a tool called DinoFracture that contained a library of scripts that could fracture models at runtime. I opened it up in an empty project and had a little play with it and was able to generate a fractured version of the door at runtime through the application of its script libraries. This game me a great effect for the door cracking on zero health but also allow the gun to shoot the broken parts of the door and these were now their own objects with their own rigidbodies and health. The final effect was quite impressive.
The last thing to do was to create an enemy spawner that would handle the creation of enemies while the event was active. This was a simple task of creating some spawnpoints in the world for the script to use and then spawning a number of enemies into the game. I did put in a check to make sure that the game did not endlessly spawn enemies however so there is a maxEnemies amount that is checked against the current spawnedEnemies, if spawnedEnemies is less than maxEnemies then the spawner will create more enemies with a delay, if they are the same or greater than the spawner will stop creating enemies until some are killed.
The final script ended up as below.
|
1 2 3 4 5 6 7 8 9 10 11 12 13 14 15 16 17 18 19 20 21 22 23 24 25 26 27 28 29 30 31 32 33 34 35 36 37 38 39 40 41 42 43 44 45 46 47 48 49 50 51 52 53 54 55 56 57 58 59 60 61 62 63 64 65 66 67 68 69 70 71 72 73 74 75 76 77 78 79 80 81 82 83 84 85 86 87 88 89 90 91 92 93 94 95 96 97 98 99 100 101 102 103 104 105 106 107 108 109 110 111 112 113 114 115 116 117 118 119 120 121 122 123 |
using System.Collections; using System.Collections.Generic; using UnityEngine; using DinoFracture; using UnityEngine.UI; public class DoorEvent : MonoBehaviour { [Header("TheDootItself")] public GameObject[] targets; public GameObject door1,door2; public float maxTime; public int currentTarget; float timer = 5.0f; public float DoorHealthMax; public float currentHealth; public GameObject impactParticle; public bool DoorActive; [Header("UIStuff")] public GameObject[] UIElements; public Slider HealthBar; [Header("SpawningStuff")] public GameObject SpawnPointContainer; private GameObject[] spawnPoints; public GameObject[] enemies; private bool canSpawn; public int maxEnemies; public int spawnedEnemies; public float maxSpawnDelay; float spawnDelay = 3.0f; public AudioSource DoorExplode; public AudioSource DoorRubble; // Start is called before the first frame update void Start() { currentHealth = DoorHealthMax; HealthBar.maxValue = currentHealth; HealthBar.value = currentHealth; HealthBar.gameObject.transform.parent.gameObject.SetActive(false); } public IEnumerator StartTheDoor() { DoorActive = true; UIElements[0].SetActive (true); UIElements[2].SetActive (true); yield return new WaitForSeconds (3.0f); UIElements[0].SetActive (false); UIElements[1].SetActive (true); yield return new WaitForSeconds (3.0f); UIElements[1].SetActive (false); StartTheSpawns(); } // Update is called once per frame void Update() { timer -=Time.deltaTime; spawnDelay -= Time.deltaTime; HealthBar.value = currentHealth; if (timer < 0.0f && DoorActive == true) { targets[currentTarget].SetActive (false); currentTarget = Random.Range(0, targets.Length); targets[currentTarget].SetActive(true); timer = maxTime; } if (currentHealth <= 0.0f && DoorActive == true){ DoorActive = false; StartCoroutine(CleanUp()); UIElements[2].SetActive (false); UIElements[3].SetActive (true); Fracture(); } if (spawnedEnemies < maxEnemies && spawnDelay <= 0.0f && canSpawn) { Instantiate(enemies[Random.Range(0, enemies.Length)], spawnPoints[Random.Range(0, spawnPoints.Length)].transform); spawnedEnemies++; spawnDelay = maxSpawnDelay; } } void Fracture() { canSpawn = false; for (int i = 0; i < targets.Length; i++) { targets[i].SetActive(false); } DoorExplode.Play(); DoorRubble.PlayDelayed(0.5f); door1.GetComponent<FractureGeometry>().Fracture(); door2.GetComponent<FractureGeometry>().Fracture(); } public void TakeDamage(float damage) { currentHealth = currentHealth - damage; GameObject hitEffect = Instantiate(impactParticle, targets[currentTarget].transform.position, Quaternion.identity); Destroy (hitEffect, 1.5f); } public void StartTheSpawns() { SpawnPointContainer.SetActive(true); spawnPoints = GameObject.FindGameObjectsWithTag("DoorSpawn"); canSpawn = true; } IEnumerator CleanUp() { yield return new WaitForSeconds (3.0f); UIElements[3].SetActive (false); StartCoroutine(GameObject.Find("Player").GetComponent<PlayerManager>().ThirdMission()); } } |
The Building
The final event of the prototype tasks the player with defending the building of an armory while it is being attacked by multiple enemies. The first thing I need to do was actually create the building that I wanted to use, so I opened up a few of my asset packs and got to work. The end result was a three tiered building with scaffold surround, this was to be used to create a feeling that the building was actually being built.

As I built the prefab I knew that I was going to use its component parts to simulate the building by looping through each of the parts and turning them on one by one in order to show the building slowly being constructed. However when I did this the effect was slightly underwhelming as the parts of the building just appeared out of nowhere. So I decided I would like them to animate in and attempted to use my previous animation recording script to see if I could produce something with this. This was not successful so I decided I would just try and lerp the parts up from under the ground.
“Lerp, or Linear Interpolation, is a mathematical function in Unity that returns a value between two others at a point on a linear scale.” as described by French (2020) and is a simple method of moving an object between two points without the need for animation. In his article entitled “The Right Way To Lerp in Unity” French has several different examples of how to do this and I was able to utilise one of these methods to create a script that would lerp each building part from its starting position to its final position.
|
1 2 3 4 5 6 7 8 9 10 11 12 13 14 15 16 17 18 19 20 21 22 23 24 25 26 27 28 29 30 31 32 33 34 35 36 37 38 |
using System.Collections; using System.Collections.Generic; using UnityEngine; public class BuildingLerp : MonoBehaviour { float lerpTime; float currentLerpTime; public float moveDistance = 2f; float perc = 100f; Vector3 startPos; Vector3 endPos; protected void Start() { startPos = transform.position; endPos = transform.position + transform.up * moveDistance; lerpTime = GameObject.Find("Armory").GetComponent<BuildArmory>().buildspeed; } protected void Update() { //increment timer once per frame currentLerpTime += Time.deltaTime; if (currentLerpTime > lerpTime) { currentLerpTime = lerpTime; } //lerp! perc = currentLerpTime / lerpTime; transform.position = Vector3.Lerp(startPos, endPos, perc); if (perc == 1.0f) { } } } |
I actually created two versions of this script so that I could utilise different times for the lerp process. This was so that the bigger parts of the building would lerp more slowly than the smaller parts. It also allowed me to balance the speed at which the whole building was built a bit more precisely.
I added in a few particle effects and then set about working out the right order to actually work through the objects. I had already broken the prefab into 3 tiers so I create an array for each of these tiers and put the items into these arrays. I then realised I could not control the order of the larger and smaller items so I had to break these arrays down even further, ending up with 6 arrays. Then all I had to do was work through a long coroutine of for loops in order to get the armory to build. Below is the final script and the final effect.
|
1 2 3 4 5 6 7 8 9 10 11 12 13 14 15 16 17 18 19 20 21 22 23 24 25 26 27 28 29 30 31 32 33 34 35 36 37 38 39 40 41 42 43 44 45 46 47 48 49 50 51 52 53 54 55 56 57 58 59 60 61 62 63 64 65 66 67 68 69 70 71 72 73 74 75 76 77 78 79 80 81 82 83 84 85 86 87 88 89 90 91 92 93 94 95 96 97 98 99 100 |
using System.Collections; using System.Collections.Generic; using UnityEngine; public class BuildArmory : MonoBehaviour { public GameObject LowerParticle, MiddleParticle, TopParticle; public GameObject[] LowerParts; public GameObject[] LowerPartsDetail; public GameObject[] MiddleParts; public GameObject[] MiddlePartsDetail; public GameObject[] TopParts; public GameObject[] TopPartsDetail; public float buildspeed; public float quickbuild; public bool startBuilding = false; public int numParts; // Start is called before the first frame update void Start() { LowerParticle.GetComponent<ParticleSystem>().Stop(); MiddleParticle.GetComponent<ParticleSystem>().Stop(); TopParticle.GetComponent<ParticleSystem>().Stop(); numParts = LowerParts.Length + LowerPartsDetail.Length + MiddleParts.Length + MiddlePartsDetail.Length + TopParts.Length + TopPartsDetail.Length; } void Update() { if (startBuilding) { StartCoroutine(Build()); } } IEnumerator Build() { startBuilding = false; LowerParticle.GetComponent<ParticleSystem>().Play(); for (int i = 0; i < LowerParts.Length; i++) { LowerParts[i].SetActive(true); yield return new WaitForSeconds(buildspeed); GameObject.Find("BuildingContainer").GetComponent<BuildingEvent>().completedParts++; } for (int i = 0; i < LowerPartsDetail.Length; i++) { LowerPartsDetail[i].SetActive(true); yield return new WaitForSeconds(quickbuild); GameObject.Find("BuildingContainer").GetComponent<BuildingEvent>().completedParts++; } LowerParticle.GetComponent<ParticleSystem>().Stop(); MiddleParticle.GetComponent<ParticleSystem>().Play(); for (int i = 0; i < MiddleParts.Length; i++) { MiddleParts[i].SetActive(true); yield return new WaitForSeconds(buildspeed); GameObject.Find("BuildingContainer").GetComponent<BuildingEvent>().completedParts++; } for (int i = 0; i < MiddlePartsDetail.Length; i++) { MiddlePartsDetail[i].SetActive(true); yield return new WaitForSeconds(quickbuild); GameObject.Find("BuildingContainer").GetComponent<BuildingEvent>().completedParts++; } MiddleParticle.GetComponent<ParticleSystem>().Stop(); TopParticle.GetComponent<ParticleSystem>().Play(); for (int i = 0; i < TopParts.Length; i++) { TopParts[i].SetActive(true); yield return new WaitForSeconds(buildspeed); GameObject.Find("BuildingContainer").GetComponent<BuildingEvent>().completedParts++; } for (int i = 0; i < TopPartsDetail.Length; i++) { TopPartsDetail[i].SetActive(true); yield return new WaitForSeconds(quickbuild); GameObject.Find("BuildingContainer").GetComponent<BuildingEvent>().completedParts++; } TopParticle.GetComponent<ParticleSystem>().Stop(); GameObject.Find("Scaffold").GetComponent<ScaffoldLerp>().removeScaffold = true; GameObject.Find("BuildingContainer").GetComponent<BuildingEvent>().canSpawn = false; } } |
The rest of the building event was pretty simple to code together and uses a similar enemy spawning mechanic as The Door event does. I did have to create specific flying enemies for this event, as detailed above, that attack the building target points but that was really the only bit of AI customisation that was needed. It was then just a matter of balancing the building time against the building health and the amount of enemies. A couple of plays through and the event was done.
The final script ended up looking like this.
|
1 2 3 4 5 6 7 8 9 10 11 12 13 14 15 16 17 18 19 20 21 22 23 24 25 26 27 28 29 30 31 32 33 34 35 36 37 38 39 40 41 42 43 44 45 46 47 48 49 50 51 52 53 54 55 56 57 58 59 60 61 62 63 64 65 66 67 68 69 70 71 72 73 74 75 76 77 78 79 80 81 82 83 84 85 86 87 88 89 90 91 92 93 94 95 96 97 98 99 100 101 |
using System.Collections; using System.Collections.Generic; using UnityEngine; using UnityEngine.UI; public class BuildingEvent : MonoBehaviour { [Header("TheBuildingItself")] public float BuildingHealthMax; public float currentHealth; public bool BuildingActive; public bool EventEnded; public GameObject nukeParticle; public GameObject scaffoldObject; [Header("UIStuff")] public GameObject[] UIElements; public Slider HealthBar; public Slider BuildingBar; public int completedParts; public GameObject gameComplete; public GameObject missionFailed; [Header("SpawningStuff")] public GameObject SpawnPointContainer; private GameObject[] spawnPoints; public GameObject[] enemies; public bool canSpawn; public int maxEnemies; public int spawnedEnemies; public float maxSpawnDelay; public ParticleSystem DustCloud; float spawnDelay = 3.0f; public AudioSource scaffoldNoise; public AudioSource buildingExplode; // Start is called before the first frame update void Start() { currentHealth = BuildingHealthMax; HealthBar.maxValue = currentHealth; HealthBar.value = currentHealth; HealthBar.gameObject.transform.parent.gameObject.SetActive(false); DustCloud.Stop(); } public IEnumerator StartTheBuilding() { BuildingActive = true; scaffoldNoise.Play(); scaffoldObject.SetActive(true); UIElements[0].SetActive (true); yield return new WaitForSeconds (3.0f); UIElements[0].SetActive (false); UIElements[1].SetActive (true); UIElements[2].SetActive (true); BuildingBar.maxValue = GameObject.Find("Armory").GetComponent<BuildArmory>().numParts; yield return new WaitForSeconds (3.0f); UIElements[1].SetActive (false); StartTheSpawns(); } // Update is called once per frame void Update() { spawnDelay -= Time.deltaTime; HealthBar.value = currentHealth; BuildingBar.value = completedParts; if (spawnedEnemies < maxEnemies && spawnDelay <= 0.0f && canSpawn) { Instantiate(enemies[Random.Range(0, enemies.Length)], spawnPoints[Random.Range(0, spawnPoints.Length)].transform); spawnedEnemies++; spawnDelay = maxSpawnDelay; } if (currentHealth <= 0) { buildingExplode.Play(); nukeParticle.SetActive(true); missionFailed.SetActive (true); UIElements[2].SetActive (false); StartCoroutine(GameObject.Find("Player").GetComponent<PlayerManager>().EndTheGame()); } if (EventEnded) { UIElements[2].SetActive (false); gameComplete.SetActive (true); StartCoroutine(GameObject.Find("Player").GetComponent<PlayerManager>().EndTheGame()); } } public void StartTheSpawns() { SpawnPointContainer.SetActive(true); spawnPoints = GameObject.FindGameObjectsWithTag("BuildingSpawn"); canSpawn = true; } public void TakeDamage(float damage) { currentHealth = currentHealth - damage; } } |
The Level
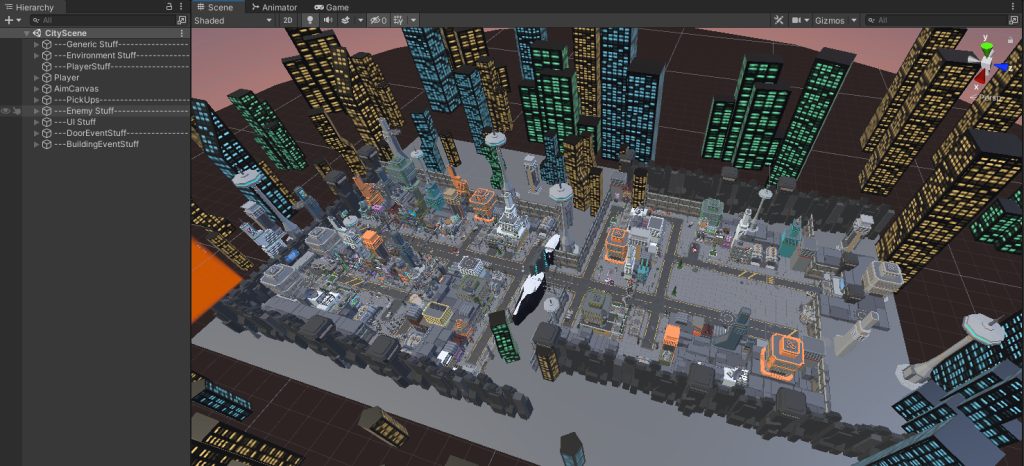
For the rest of the level, outside of the events, I just needed some random enemy spawns that the player could interact with as they progressed through the level. i had already built the level as I was testing the controllers and AI just so that I had an area to use but also to allow me to step away when things got a little tricky to get my head in order and just do some old fashioned level design.
However when I put the spawn areas in the AI decided that it was going to start attacking the player no matter where he was so I had to put in some management of these spawns and the events, and that called for a Player Manager script. This was a simple matter of throwing some triggers in throughout the level and giving them tags and then looking for these tags on a script on the Player in order to fire off events.
This script also communicated with the UI to set messages and different UI elements active at certain points of the prototype.
|
1 2 3 4 5 6 7 8 9 10 11 12 13 14 15 16 17 18 19 20 21 22 23 24 25 26 27 28 29 30 31 32 33 34 35 36 37 38 39 40 41 42 43 44 45 46 47 48 49 50 51 52 53 54 55 56 57 58 59 60 61 62 63 64 65 66 67 68 69 70 71 72 73 74 75 76 77 78 79 80 81 82 83 84 85 86 87 88 89 90 91 92 93 94 95 96 97 98 99 100 101 102 103 104 105 106 107 108 109 110 111 112 113 114 115 116 117 118 119 120 121 122 123 124 125 126 127 128 129 130 131 132 133 134 135 136 137 138 139 140 141 142 143 144 145 146 147 148 149 150 151 152 153 |
using System.Collections; using System.Collections.Generic; using UnityEngine; using UnityEngine.UI; using UnityEngine.SceneManagement; public class PlayerManager : MonoBehaviour { [Header("General Stuff")] public Text cogAmountText; public int cogAmount; [Header("Door Event")] public GameObject PreEnemies; [Header("BuildingEvent")] public GameObject BuildingPrefab; [Header("UI Stuff")] public GameObject[] UIElements; public GameObject[] MissionUIElements; public GameObject deathUI; public GameObject Pistol; public GameObject Rifle; public Text damageBoost; public int damageBoostAmount; [Header("Mission Stuff")] public GameObject Mission2Enemies; public GameObject PrepareTheDoor; public GameObject DoorStartTrigger; public GameObject PostDoorAttack; [Header("Character Stuff")] public GameObject[] models; // Start is called before the first frame update void Start() { MissionUIElements[0].SetActive(true); Destroy(MissionUIElements[0], 5.0f); StartCoroutine(FirstMission()); for (int i = 0; i < models.Length; i++) { models[i].SetActive (false); } models[GameObject.Find("UIManager").GetComponent<UIManager>().skinNumber].SetActive(true); } private void OnTriggerEnter(Collider other) { if (other.tag == "DoorEventPrep" ) { PreEnemies.SetActive (true); } if (other.tag == "DoorEvent" ) { StartCoroutine(GameObject.Find("TheDoor").GetComponent<DoorEvent>().StartTheDoor()); MissionUIElements[4].SetActive(false); Destroy (other.gameObject); } if (other.tag == "CogPickup") { cogAmount = cogAmount + Random.Range (10,30); cogAmountText.text = "Cogs: " + cogAmount.ToString(); Destroy(other.gameObject); } if (other.tag == "BuildingEventStart" ) { MissionUIElements[6].SetActive(false); StartCoroutine(GameObject.Find("BuildingContainer").GetComponent<BuildingEvent>().StartTheBuilding()); Destroy (other.gameObject); } if (other.tag == "BuildingPlans") { Destroy(other.gameObject); StartCoroutine(SecondMission()); } if (other.tag == "Pistol") { UIElements[2].SetActive(true); Pistol.SetActive(true); Rifle.SetActive(false); } else if (other.tag == "Rifle") { UIElements[2].SetActive(true); Pistol.SetActive(false); Rifle.SetActive(true); } damageBoost.text = damageBoostAmount.ToString() + "%"; } public IEnumerator KillThePlayer() { for (int i = 0; i < UIElements.Length; i++) { UIElements[i].SetActive (false); } deathUI.SetActive(true); yield return new WaitForSeconds(3.0f); Cursor.visible = true; Cursor.lockState = CursorLockMode.None; GameObject.Find("UIManager").GetComponent<UIManager>().GameState = 1; SceneManager.LoadScene(0); } public IEnumerator EndTheGame() { for (int i = 0; i < UIElements.Length; i++) { UIElements[i].SetActive (false); } yield return new WaitForSeconds(3.0f); Cursor.visible = true; Cursor.lockState = CursorLockMode.None; GameObject.Find("UIManager").GetComponent<UIManager>().GameState = 1; SceneManager.LoadScene(0); } public void ShowUIMessage(int messageNumber) { MissionUIElements[messageNumber].SetActive(true); Destroy(MissionUIElements[messageNumber], 5.0f); } IEnumerator FirstMission() { yield return new WaitForSeconds (6.0f); ShowUIMessage(1); yield return new WaitForSeconds (5.0f); MissionUIElements[2].SetActive(true); } IEnumerator SecondMission() { MissionUIElements[2].SetActive(false); ShowUIMessage(3); Mission2Enemies.SetActive(true); PrepareTheDoor.SetActive(true); DoorStartTrigger.SetActive (true); yield return new WaitForSeconds (5.0f); MissionUIElements[4].SetActive(true); } public IEnumerator ThirdMission() { yield return new WaitForSeconds (5.0f); ShowUIMessage(5); PostDoorAttack.SetActive(true); yield return new WaitForSeconds (5.0f); MissionUIElements[6].SetActive(true); } } |
It was then just a matter of testing everything and making sure that nothing was too broken to be considered part of the prototype. There are a few little issues in there but nothing critical that stops a player from progressing.
The UI
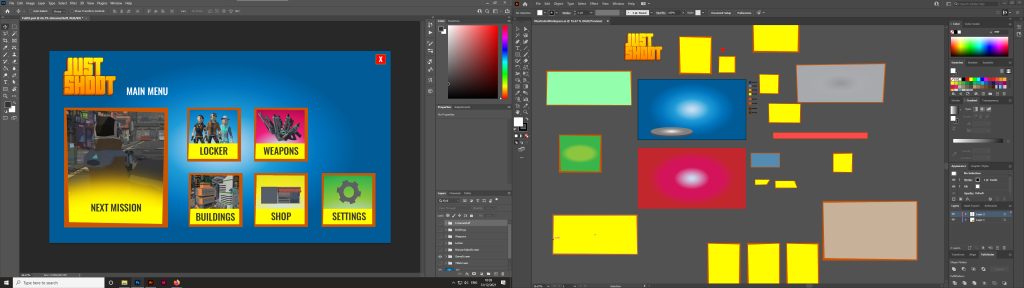
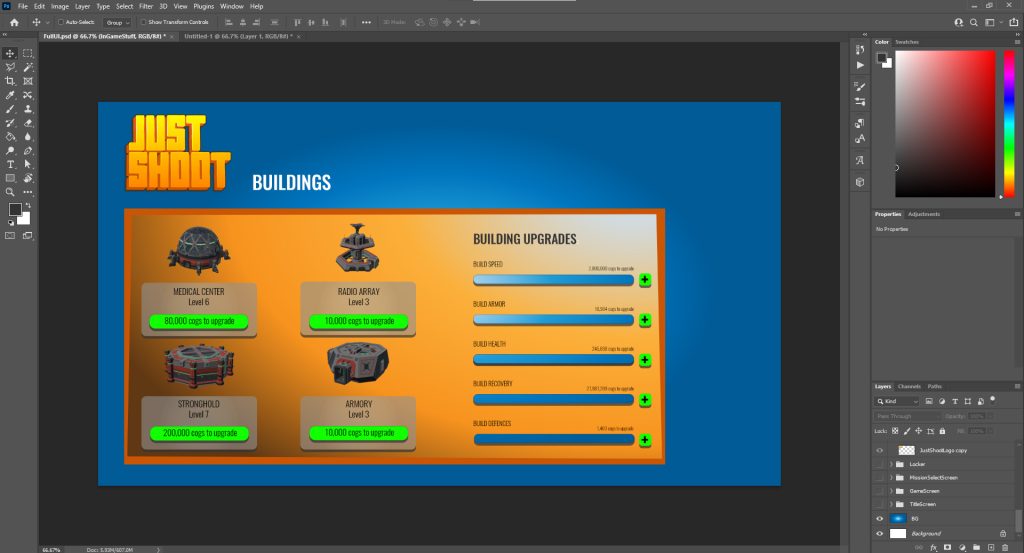
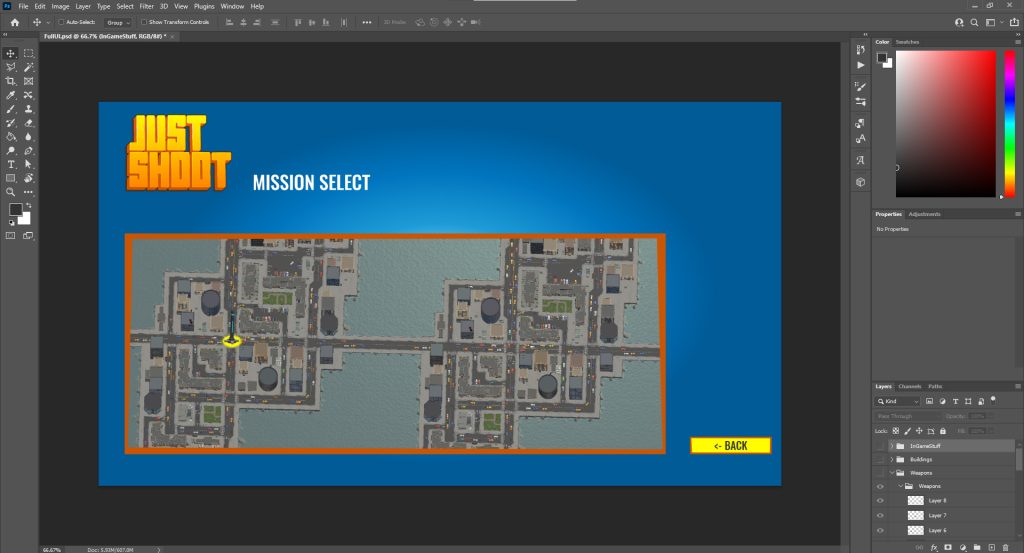
User Experience is something that I can do quite quickly as it has been my specialty for the last 20 or so years. I knew the screens that I needed to create from the aspects that I had coded into the game, weapons, buildings, character, and mission select. I also knew these did not really need to function 100% so was able to quickly create the different screens, cut them up for export and bring them into the game.

Of course it all needed to work in Unity so I had to create a UI Manager script that basically runs the whole of the UI and sits in a Do Not Destroy object so no matter which scene is loaded the UI is there and ready to be given information so that it can display it correctly.
There were two areas where I need a little refreshing with regards to the UI. The minimap was something have not done in a while but was able to refresh my memory with a quick watch of Code Monkey’s (2018) How to make a Simple Minimap (Unity Tutorial for Beginners) video that reminded me about Camera culling masks and their use, along with render textures. The render texture aspect actually also reminded me of how to implement the 3D object into the 2D canvas. So the character model that is used is far off in the scene and has its own camera that renders to a texture that is displayed in the Canvas. Pretty simple really.
The final UI Manager script ended up looking like this. I take advantage of a switch statement here to run the UI by changing the state that the game is in using a simple integer variable.
|
1 2 3 4 5 6 7 8 9 10 11 12 13 14 15 16 17 18 19 20 21 22 23 24 25 26 27 28 29 30 31 32 33 34 35 36 37 38 39 40 41 42 43 44 45 46 47 48 49 50 51 52 53 54 55 56 57 58 59 60 61 62 63 64 65 66 67 68 69 70 71 72 73 74 75 76 77 78 79 80 81 82 83 84 85 86 87 88 89 90 91 92 93 94 95 96 97 98 99 100 101 102 103 104 105 106 107 108 109 110 111 112 113 114 115 116 117 118 119 120 121 122 123 124 125 126 127 128 129 130 131 132 133 134 135 136 137 138 139 140 141 142 143 144 145 146 147 148 149 150 151 152 153 154 155 156 157 158 159 160 161 162 163 164 165 166 167 168 169 170 171 172 173 174 175 176 177 178 179 180 181 182 183 184 185 186 187 188 189 190 191 192 193 194 195 196 197 198 199 200 201 202 203 204 205 206 207 208 209 210 211 212 213 |
using System.Collections; using System.Collections.Generic; using UnityEngine; using UnityEngine.UI; using UnityEngine.SceneManagement; public class UIManager : MonoBehaviour { public int GameState; //Grab the canvases public Canvas BG, TitleScreen, MainMenu, MissionSelect, LockerScreen, WeaponSelect, BuildingScreen, LoadingScreen; public Slider loadingSlider; public CanvasGroup canvasGroup; public GameObject[] Skins; public int skinNumber = 0; AsyncOperation loadingOperation; private bool loading; void Awake() { SetUpSingleton(); } void SetUpSingleton() { if (FindObjectsOfType(GetType()).Length > 1) { Destroy(gameObject); } else { DontDestroyOnLoad(gameObject); } } // Start is called before the first frame update void Start() { //Turn of the canvases BG.enabled = false; TitleScreen.enabled = false; MainMenu.enabled = false; MissionSelect.enabled = false; LockerScreen.enabled = false; WeaponSelect.enabled = false; BuildingScreen.enabled = false; LoadingScreen.enabled = false; //Set the initial gamestate GameState = 0; } // Update is called once per frame void Update() { if (loading) { loadingSlider.value = Mathf.Clamp01(loadingOperation.progress / 0.9f); } switch (GameState) { case 0: //Title Screen BG.enabled = true; TitleScreen.enabled = true; MainMenu.enabled = false; MissionSelect.enabled = false; LockerScreen.enabled = false; WeaponSelect.enabled = false; BuildingScreen.enabled = false; LoadingScreen.enabled = false; break; case 1: //Main Menu BG.enabled = true; TitleScreen.enabled = false; MainMenu.enabled = true; MissionSelect.enabled = false; LockerScreen.enabled = false; WeaponSelect.enabled = false; BuildingScreen.enabled = false; LoadingScreen.enabled = false; break; case 2: //Mission Select BG.enabled = true; TitleScreen.enabled = false; MainMenu.enabled = false; MissionSelect.enabled = true; LockerScreen.enabled = false; WeaponSelect.enabled = false; BuildingScreen.enabled = false; LoadingScreen.enabled = false; break; case 3: //Locker Screen BG.enabled = true; TitleScreen.enabled = false; MainMenu.enabled = false; MissionSelect.enabled = false; LockerScreen.enabled = true; WeaponSelect.enabled = false; BuildingScreen.enabled = false; LoadingScreen.enabled = false; break; case 4: //Weapon Select BG.enabled = true; TitleScreen.enabled = false; MainMenu.enabled = false; MissionSelect.enabled = false; LockerScreen.enabled = false; WeaponSelect.enabled = true; BuildingScreen.enabled = false; LoadingScreen.enabled = false; break; case 5: //Building Screen BG.enabled = true; TitleScreen.enabled = false; MainMenu.enabled = false; MissionSelect.enabled = false; LockerScreen.enabled = false; WeaponSelect.enabled = false; BuildingScreen.enabled = true; LoadingScreen.enabled = false; break; case 6: //In Game BG.enabled = false; TitleScreen.enabled = false; MainMenu.enabled = false; MissionSelect.enabled = false; LockerScreen.enabled = false; WeaponSelect.enabled = false; BuildingScreen.enabled = false; LoadingScreen.enabled = false; break; case 7: //loading BG.enabled = true; TitleScreen.enabled = false; MainMenu.enabled = false; MissionSelect.enabled = false; LockerScreen.enabled = false; WeaponSelect.enabled = false; BuildingScreen.enabled = false; LoadingScreen.enabled = true; break; } } public void ChangeGameState(int newState) { GameState = newState; } public void QuitGame(){ Application.Quit(); } public void LoadGame(){ StartCoroutine(LoadGameScene()); } public IEnumerator LoadGameScene(){ GameState = 7; loading = true; loadingOperation = SceneManager.LoadSceneAsync(1); while (!loadingOperation.isDone){ yield return null; } yield return StartCoroutine(FadeLoadingScreen(0, 1)); GameState = 6; canvasGroup.alpha = 1.0f; } IEnumerator FadeLoadingScreen(float targetValue, float duration) { float startValue = canvasGroup.alpha; float time = 0; while (time < duration) { canvasGroup.alpha = Mathf.Lerp(startValue, targetValue, time / duration); time += Time.deltaTime; yield return null; } canvasGroup.alpha = targetValue; } public void ChangeSkin(int sknNumber) { for (int i = 0; i < Skins.Length; i++) { Skins[i].SetActive (false); } skinNumber = sknNumber; Skins[sknNumber].SetActive(true); } } |
Complete Asset List
Below are all the assets and asset packs I utilised within the creation of Just Shoot.
- Action RPG Effects – https://assetstore.unity.com/packages/vfx/particles/action-rpg-fx-38222
- Synty Polygon Particle Effects – https://assetstore.unity.com/packages/vfx/particles/polygon-particle-fx-low-poly-3d-art-by-synty-168372
- Unity Particle Pack – https://assetstore.unity.com/packages/essentials/tutorial-projects/unity-particle-pack-127325
- Unity Standard Assets Third Person Controller – https://assetstore.unity.com/packages/essentials/starter-assets-third-person-character-controller-196526
- Synty Polygon Construction – https://assetstore.unity.com/packages/3d/environments/industrial/polygon-construction-low-poly-3d-art-by-synty-168036
- Synty Polygon Sci Fi City – https://assetstore.unity.com/packages/3d/environments/sci-fi/polygon-sci-fi-city-low-poly-3d-art-by-synty-115950
- Synty Polygon Sci Fi Space – https://assetstore.unity.com/packages/3d/environments/sci-fi/polygon-sci-fi-space-low-poly-3d-art-by-synty-138857
- DinoFracture – https://assetstore.unity.com/packages/tools/physics/dinofracture-a-dynamic-fracture-library-26599
- Asset Hunter Pro – https://assetstore.unity.com/packages/tools/utilities/asset-hunter-pro-135296
- Gun and Explosion Sounds – https://assetstore.unity.com/packages/audio/sound-fx/weapons/gun-explosion-sounds-176739
- Sci-Fi Gun Sounds – https://assetstore.unity.com/packages/audio/sound-fx/weapons/sci-fi-gun-sounds-162226
Conclusion
I was really able to test my knowledge in the creation of this prototype and produce something very very close to how I envisage the final product to actually look and feel. I was reassured at the little amount of searching I had to do in order to solve problems and take great accomplishment in the fact that a lot of this prototype was constructed using existing knowledge. There was also the learning into state machines and animation rigging that has really got me excited for what I could do with these features in the future.
And if you fancied playing the final prototype you can download it here.
References
Brackeys, 2020. Make your Characters Interactive! – Animation Rigging in Unity. [online] Youtube.com. Available at: <https://www.youtube.com/watch?v=BEZHVYk6Fa4> [Accessed 10 November 2021].
Code Monkey, 2018. How to make a Simple Minimap (Unity Tutorial for Beginners). [online] Youtube.com. Available at: <https://www.youtube.com/watch?v=kWhOMJMihC0> [Accessed 23 December 2021].
Code Monkey, 2021. [online] Awesome Third Person Shooter Controller! (Unity Tutorial). Available at: <https://www.youtube.com/watch?v=FbM4CkqtOuA> [Accessed 3 November 2021].
Code Monkey, 2021. Awesome Easy DESTRUCTION in Unity! (Add SECRETS!). [online] Youtube.com. Available at: <https://www.youtube.com/watch?v=tPWMZ4Ic7PA> [Accessed 3 January 2022].
French, J., 2020. The right way to Lerp in Unity (with examples) – Game Dev Beginner. [online] Game Dev Beginner. Available at: <https://gamedevbeginner.com/the-right-way-to-lerp-in-unity-with-examples/> [Accessed 23 December 2021].
iHeartGameDev, 2020. How to Animate Characters in Unity 3D | Animation Retargeting Explained. [online] Youtube.com. Available at: <https://www.youtube.com/watch?v=BEZHVYk6Fa4> [Accessed 15 November 2021].
The Kiwi Coder, 2020. Unity Third Person Shooter – Using Animation Rigging. [online] Youtube.com. Available at: <https://www.youtube.com/playlist?list=PLyBYG1JGBcd1E4CigRSDE9YdH8syiDY6-> [Accessed 7 November 2021].
The Kiwi Coder, 2021. Unity – AI Series. [online] Youtube.com. Available at: <https://www.youtube.com/watch?v=BEZHVYk6Fa4> [Accessed 5 December 2021].
Shora, N., 2020. State Pattern using Unity. [online] raywenderlich.com. Available at: <https://www.raywenderlich.com/6034380-state-pattern-using-unity> [Accessed 20 December 2021].
Unity Technologies, 2020. Unity – Manual: State Machine Basics. [online] Docs.unity3d.com. Available at: <https://docs.unity3d.com/Manual/StateMachineBasics.html> [Accessed 20 December 2021].
Figures
Featured Image: Charlish, R (2021) ‘Just Shoot Gameplay’ Created on 30th December 2021
Figure 1: Charlish, R (2022) ‘Hack n Plan project for Pre-prod’ Created on 3rd January 2022
Figure 2: Charlish, R (2022) ‘Starter Asset Third Person Controller’ Created on 3rd January 2022
Figure 3: Charlish, R (2022) ‘Character Inspector items’ Created on 3rd January 2022
Figure 4: Charlish, R (2022) ‘The Final Player Prefab’ Created on 3rd January 2022
Figure 5: Charlish, R (2022) ‘The Enemy Types’ Created on 3rd January 2022
Figure 6: Charlish, R (2021) ‘Bipedal Enemy state machine’ Created on 21st December 2021
Figure 7: Charlish, R (2022) ‘Enemy working in game’ Created on 3rd January 2022
Figure 8: Charlish, R (2022) ‘The Door in Unity’ Created on 3rd January 2022
Figure 9: Charlish, R (2021) ‘The Door Explodes’ Created on 28th December 2021
Figure 10: Charlish, R (2022) ‘The Building prefab’ Created on 3rd January 2022
Figure 11: Charlish, R (2022) ‘Final building effect’ Created on 3rd January 2022
Figure 12: Charlish, R (2022) ‘The Level’ Created on 3rd January 2022
Figure 13: Charlish, R (2022) ‘UI Creation’ Created on 3rd January 2022
Figure 14: Charlish, R (2022) ‘Different UI Screens’ Created on 3rd January 2022