This is the first of many posts surrounding the development of my Final Major Project for the course. I am embarking on the project alongside Anouk Dutrée with us each taking on specific roles within the project. Anouk will be handling the majority of the art side of the project while also contributing to the code and design, while I will be handling the code and design side exclusively.
The project has been devised and formulated to help us answer our research question and give us an opportunity to explore our theories and initial research.
How do we address/cater to a target audience defined by their interest in dragons, as
opposed to their love of a specific game-play genre, through a PC game?
Our inital research has given us some valuable direction to answering this question and these dev logs willd ocument and illsutrate the process and path I take through the development of a product that will allow us to test our hypothhesis and produce more research and results around the question.
The Game
Draak & Draig is a video game experience that places the player into the role of a Weredragon, a species hunted to near extinction, and tasks them with regaining their lost lands and avenging their fallen brethren.
Living amongst the humans by day, performing tasks in order to manipulate them to do you bidding, and terrorising them at night, training your abilities and causing chaos and destruction. Succeed and you will slowly be able to regain your lands, fail and it may be the end of your species.
The game utilises a 24 hour game loop mechanic where the player experiences two types of game play, oen type during the day and another during the night. The day section puts the player in a first person perspective, performing tasks and gaining resources, whereas the night section uses a third person view as you fly around as a dragon causing mayhem and destruction. The loop is illustrated in the figure below.

Initial Preparations
The first course of action was to setup and prepare the project for development. As this project is quite sizable we have already realised that there will be need to leverage the Unity Asset Store to find assets we can use to speed up the development process, so these needed to be considered in the set up of the project.
We decided that we would need a considerable start to the environmental assets to allow us to concentrate on some of the more bespoke art aspects early on. We identified a pack of assets produced by Unity themselves that would give us the basis of an environment along with several props we could use within the develop, the Viking Village URP package.

This was added to the project and the Github repository set up. Alongside this I added some tools that I would be using within the Unity Engine.
- Universal RP
- Cinemachine
- Input System
- ShaderGraph
- Terrain Tools
With these setup in the project I began development of my aspects of the first sprint.
FPV Controller
Thankfully I have created First Person controllers before so I knew that in the beginning this would be a simple task, made even more easy by the fact that Unity provide a basic movement script within their documentation. It took no time at all to implement this into the game, however Unity’s example script utilises their old input system to handle the player input and I was wanting to utilise the new input system. This was mainly due to be able to utilise different control methods between the day and night sections and the new input system has a nice way to handle this through Action Maps.
With a small adaption to the code to change the way that inputs were handled I quickly had an object moving around the world using the commonly accepting WASD and mouse controls scheme.
|
1 2 3 4 5 6 7 8 9 10 11 12 13 14 15 16 17 18 19 20 21 22 23 24 25 26 27 28 29 |
void Update() { groundedPlayer = controller.isGrounded; if (groundedPlayer && playerVelocity.y < 0) { playerVelocity.y = 0f; } //Vector3 move = new Vector3(Input.GetAxis("Horizontal"), 0, Input.GetAxis("Vertical")); //controller.Move(move * Time.deltaTime * playerSpeed); Vector2 movement = inputManager.GetPlayerMovement(); Vector3 move = new Vector3 (movement.x, 0f, movement.y); controller.Move(move * Time.deltaTime * playerSpeed); if (move != Vector3.zero) { gameObject.transform.forward = move; } // Changes the height position of the player.. if (inputManager.PlayerInteractThisFrame() /*Input.GetButtonDown("Jump")*/ && groundedPlayer) { playerVelocity.y += Mathf.Sqrt(jumpHeight * -3.0f * gravityValue); } playerVelocity.y += gravityValue * Time.deltaTime; controller.Move(playerVelocity * Time.deltaTime); } |
The next thing to attempt was to add the First Person camera system over the top of this input system to fully realise what we wanted. We had also already decided that we wanted to leverage the functions of the Cinemachine tool system for the cameras in order to enable camera switching throughout the game in a seemless and clean way.
I was able to find an excellent tutorial by Samyam (2020) which details how to integrate the Cinemachine system into the control script. So I went about adding this in and quickly had the player moving around and using the mouse to change view and move direction.
Through this method the author details methods on creating custom extensions for the Cinemachine system in order to get the camera to follow the mouse input. There is a newer way to do this using an extension provided by Unity, however I wanted to be able to have more control of this fuction later on so opted to utilise this extension method to allow me that control in future.
|
1 2 3 4 5 6 7 8 9 10 11 12 13 14 15 16 17 18 19 20 21 22 23 24 25 26 27 28 29 30 31 32 33 34 35 |
using UnityEngine; using Cinemachine; public class CinemachinePOVExtension : CinemachineExtension { [SerializeField] private float horizontalSpeed = 10f; [SerializeField] private float verticalSpeed = 10f; [SerializeField] private float clampAngle = 40f; private InputManager inputManager; private Vector3 startingRotation; protected override void Awake() { inputManager = InputManager.Instance; base.Awake(); } protected override void PostPipelineStageCallback(CinemachineVirtualCameraBase vcam, CinemachineCore.Stage stage, ref CameraState state, float deltaTime) { if (vcam.Follow) { if (stage == CinemachineCore.Stage.Aim) { if (startingRotation == null) startingRotation = transform.localRotation.eulerAngles; Vector2 deltaInput = inputManager.GetMouseDelta(); startingRotation.x += deltaInput.x * verticalSpeed * Time.deltaTime; startingRotation.y += deltaInput.y * horizontalSpeed * Time.deltaTime; startingRotation.y = Mathf.Clamp (startingRotation.y, -clampAngle, clampAngle); state.RawOrientation = Quaternion.Euler(-startingRotation.y, startingRotation.x, 0f); } } } } |
The basic premise behind this is to get the delta of the mouse and use it to set the rotation of the Cinemachine Virtual Camera at runtime, thus allowing you to use the mouse to control where the camera is pointing.
Interacting with something
The next mechanic I wanted to approach was having the camera switch to focus on a target you are interacting with. This was something I thought would be easy to achieve however I was very wrong. With Cinemachine essentially you are using Virtual Cameras that work alongside the Main Camera in order to set the position and rotation of the Main Camera. So my theory was that if I have a Virtual Camera just looking straight ahead on the player then I would be able to blend between the mouselook camera and this interact camera.
The problem with this however is the First Person controller with the mouse look Virtual Camera does not actually rotate. Therefore whenever I switched between the mouselook camera and the interact camera the view would blend toward the world forward vector.
So I had to work out how to update the interact cameras rotation on the Y axis to mirror that of the current mouse looks position. I first tried applying the same extension I had written to control the mouse look camera to move the interact camera, looking its rotation on the X and Z axis so that it only rotated around the Y. However what I found was that this did not update on a camera that was not the highest priority. So I went to looking in to the Cinemachine documentation, an interesting place I might add, and managed to find a way to set a Virtual Cameras position at runtime.
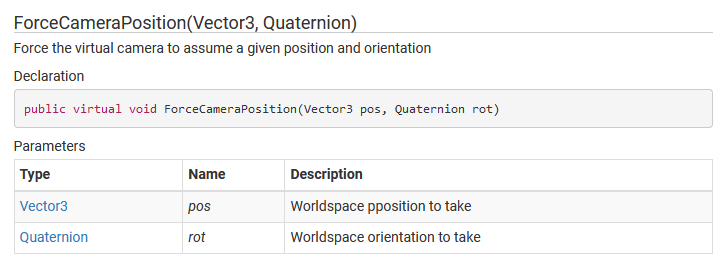
What this allowed me to was utilise the Main Camera position at the point of interaction in order to set the Y rotation of the interact camera, that way when you switch to the camera it will inherit the Y rotation and create a nice pan down to focusing directly in front of the player.
|
1 2 3 4 5 6 7 8 9 10 11 12 13 14 15 16 17 18 19 20 21 22 23 24 25 26 27 28 29 30 31 32 33 34 35 36 37 38 |
using UnityEngine; using Cinemachine; public class PlayerController : MonoBehaviour { private Transform cameraTransform; [Header ("Cameras")] public CinemachineVirtualCamera FirstPersonCam; public CinemachineVirtualCamera InteractCam; private void Start() { cameraTransform = Camera.main.transform; } void Update() { if (inputManager.PlayerInteractThisFrame() && Interacting == false) { Interacting = true; //Set the interact camera angle Quaternion rot = Quaternion.Euler (0f, cameraTransform.eulerAngles.y, 0f); InteractCam.ForceCameraPosition(cameraTransform.position, rot); //Switch the cameras FirstPersonCam.m_Priority = 0; InteractCam.m_Priority = 10; } else if (inputManager.PlayerInteractThisFrame() && Interacting == true) { Interacting = false; //Switch the cameras InteractCam.m_Priority = 0; FirstPersonCam.m_Priority = 10; } } } |
In future I will be able to get the position of the thing you are interacting with and with some simple vector maths get the camera to focus in the direction of this object and the camera will then move down nicely and frame the interactable object. I will be able to use this for the mini games in the resource gathering mechanics as well as when you are interacting with characters in the village area.
Additionally I will be able to use the same functionality to reset the position of the mouse look camera so that when you back out of interacting it will return the player to a nice forward view rather than where they came from when they interacted.
Furthermore with my new knowledge of the documentation I am going to add a slight FOV change when you move to the interact camera, so that when you back out you will be able to see that you have returned to mouse look.
Next Tasks
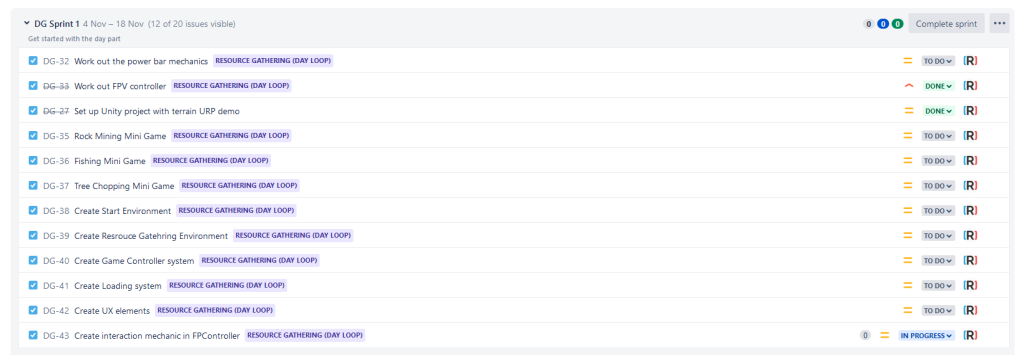
Now that I have the basic functionality in with the movement and the camera system I can now start to implement the day time mechanics and game management system. These are detailed with our project management and thankfully Anouk has already produced a lot of the assets that are required for this section so I am able to work through my backlog for this sprint quite easily.
My next Dev Log is planned for the 11th December.
References
CINEMACHINE (no date) Namespace cinemachine: Cinemachine: 2.6.17, Cinemachine | 2.6.17. Available at: https://docs.unity3d.com/Packages/com.unity.cinemachine@2.6/api/Cinemachine.html (Accessed: November 20, 2022).
SAMYAM. 2020. ‘Cinemachine First Person Controller w/ Input System – Unity Tutorial’ Available at : https://www.youtube.com/watch?v=5n_hmqHdijM [accessed November 3rd 2022].
UNITY TECHNOLOGIES. 2022. ‘Viking Village URP’. Available at: https://assetstore.unity.com/packages/essentials/tutorial-projects/viking-village-urp-29140 [accessed 28 Oct 2022].
Figures
Featured Image: Charlish, R (2022) ‘Draaak & Draig’ Created on 12th October 2022
Figure 1: Charlish, R (2022) ‘Draak & Draig Game Loop diagram’ Created on 27th October 2022
Figure 2: Unity Technologies (n.d) ‘Viking Village URP asset pack available on the Unity Asset Store’ Created on 20th November 2022
Figure 3: Charlish, R (2022) ‘Cinemachine ForceCameraPosition documentation’ Created on 20th November 2022
Figure 4: Charlish, R (2022) ‘My work backlog for this sprint in Jira’ Created on 20th November 2022

0 Comments