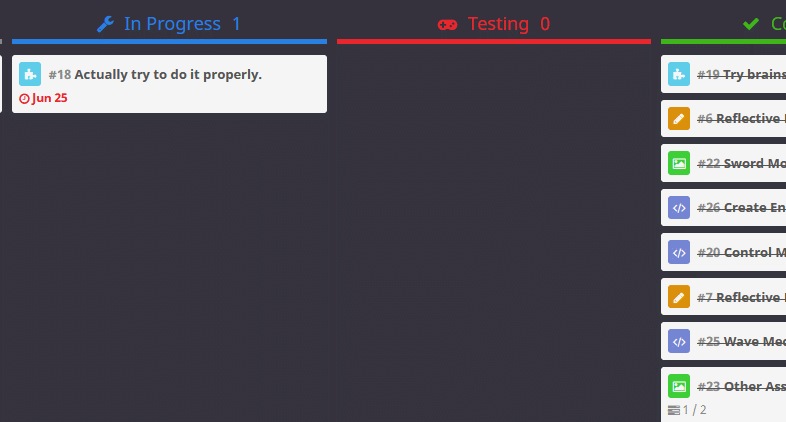
So at the end of my last post on this small project I made it a point to ensure the next thing I did was the Wave mechanic for the game. I also wanted to ensure I was maintaining my methodology and practice. So I made a conscious decision to do something to remind me of this.
So with that out of the way it was on to the Wave mechanic. So the design for this was for the game to spawn a number of enemies within a wave, monitor the amount of enemies that were alive, and once they were all dead end the wave and prepare for the next wave. This would be the point at which I could then increase the amount of enemies or change their behaviors to increase difficulty.
The best place for me to run all of this would be through the GameManager script but I would also need to include UI aspects as well so I started out by making sure I could easily access these parts of the code by referencing these elements within the GameManager script, it was just to save me time.
So I had to basically put in two aspects to the wave mechanic, a game loop and a way of tracking the enemies. Tracking the enemies was easy as I spawned these within a for loop so I could just add one to an int every time it spawned an enemy for the amount of enemies the wave was allowed to spawn. Then I would just have to wait until that int hit zero again and I would know the wave was over. However what this meant was that I would need to find out when a wave was active, and when the player had finished a wave and was in the period in-between waves, so a simple bool check was also required.
So now I could check when a wave was active and how many enemies were in that wave/left I just need to add it all in to a basic loop. So I needed to start the wave and end the wave, thankfully I could use the simple bool check to work out when to run these functions alongside the tracking of the current enemy amount. I did need to pull out the initial wave as a seperate function just to make sure I could clear down any progress a player had made on a re-attempt. What I ended up with was this.
|
1 2 3 4 5 6 7 8 9 10 11 12 13 14 15 16 17 18 19 20 21 22 23 24 25 26 27 28 29 30 31 32 33 34 35 36 37 38 39 40 41 42 43 44 |
IEnumerator SpawnWave() { Vector3 center = transform.position; for (int i = 0; i < EnemyAmount; i++){ Vector3 pos = RandomCircle(center, 20.0f); Quaternion rot = Quaternion.FromToRotation(Vector3.forward, center-pos); Instantiate(prefab, pos, rot); CurrentWaveAmount++; yield return new WaitForSeconds(0.5f); } } void Update() { if (WaveActive == true && CurrentWaveAmount == 0) { FireEndWave(); } } public void StartGameButton(){ EnemyAmount = CurrentEnemyAmount; SpawnWaveRoute = StartCoroutine(SpawnWave()); UIManager.GetComponent<UIManager>().GameState = 1; PlayerManager.GetComponent<PlayerManager>().Health = 10; UIManager.GetComponent<UIManager>().Score = 0; UIManager.GetComponent<UIManager>().Wave ++; UIManager.GetComponent<UIManager>().ResetUpgrades(); StartGame.Play(); WaveActive = true; } public void StartNextWave(){ EnemyAmount = CurrentEnemyAmount; SpawnWaveRoute = StartCoroutine(SpawnWave()); UIManager.GetComponent<UIManager>().GameState = 1; UIManager.GetComponent<UIManager>().Wave ++; WaveActive = true; } void FireEndWave() { WaveActive = false; UIManager.GetComponent<UIManager>().GameState = 2; CurrentEnemyAmount = CurrentEnemyAmount + EnemyIncrease; } |
So with this implemented (and tested a little bit) I now had all the functional aspects of the game made. It was now just a question of putting it all together, adding in a User Interface, some effects and some sounds and the game would basically come together.
Of course I had completely forgotten that I wanted to put an upgrade system into the game so off I went (totally ignoring my project management) to start on the more aesthetic aspects. I found a few asset packs that I already had access to and a few new ones and started pulling out assets and throwing together a UX and some particle effects. Then the upgrade system dawned on me, and what was more annoying is that I had prepared for it before I started the wave mechanic because I added a reference into the GameManager script in order to easily change the player’s attributes.
So I went to work on the upgrade system, and it was pretty simple as it was basically just maths. Every time the player clicks on the button to increase an attribute, add 1 to something and let it does it stuff. Now the code aspect of this went in no problem, I had the UI talking to the PlayerManager and it worked perfectly, however the visual aspect of it did not. Whenever I tried to scale the shadow up in any way it just did not work correctly and moved the position of the shadow.
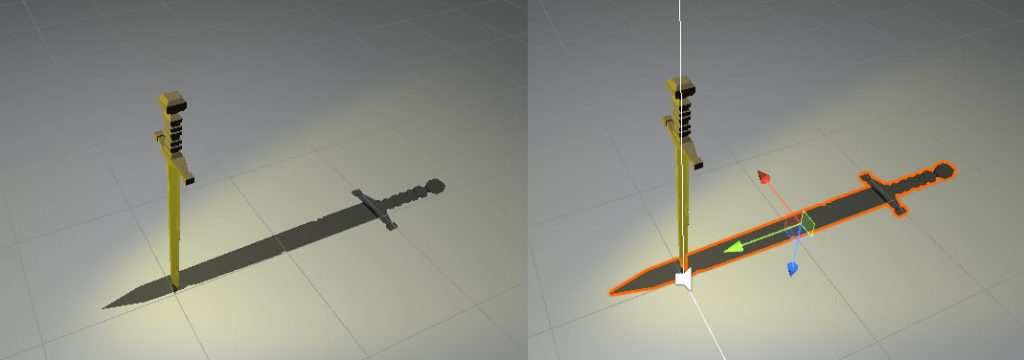
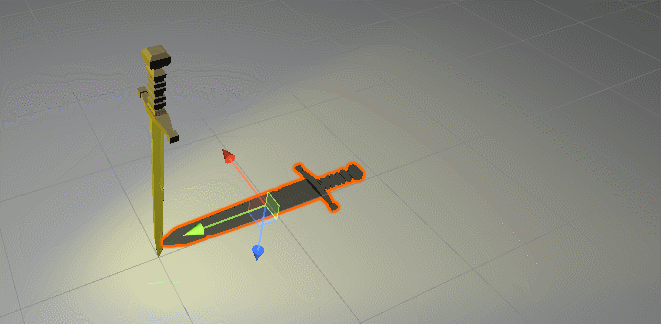
So as you can see the shadow would not stick to its correct position because its origin point was in the middle of the object, meaning that when I scaled the object it would scale it equally in both directions from this middle point. So I needed to move the origin point of the shadow to the point of the sword so that it would scale from this point.
So I had to go into Blender, something I really do not like doing because 3D modelling and software is just witchcraft to me. Thankfully after a little research I was able to find out how to do this within Blender thanks to a lovely little help article by Farrajota Ramos (2020). It did involve being ambidextrous with a few keyboard inputs but I was able to move the origin point of the sword and get it working how I needed it to.
So with that done I had a functioning upgrade system and now I could start adding it all together. I built the UI in various canvases so that I could disable the Canvas Component when I needed to hide different aspects, this is considered best practice as disabling the GameObject itself will trigger a rebuild of the vertex buffer which can slow down the performance, Unity (2021).
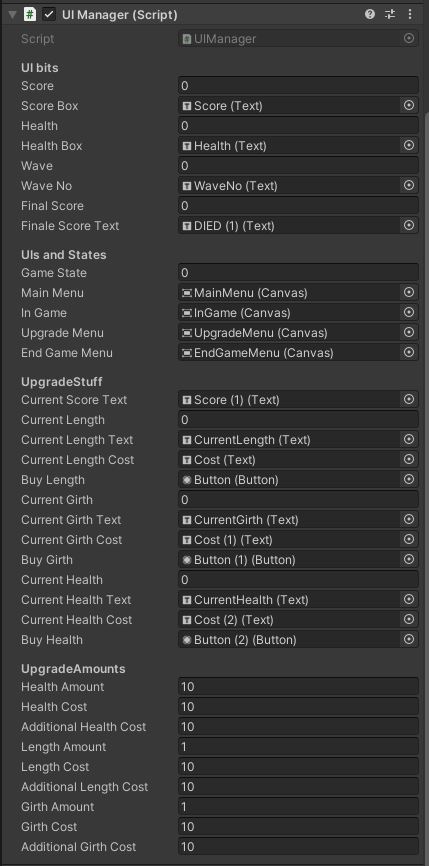
It did get a little complicated in places as there was a lot to track across the various aspects of the game, with lots of data going backwards and forwards, in the end the UIManager script ended up looking like this in the inspector.
And the code itself ended up looking like this.
|
1 2 3 4 5 6 7 8 9 10 11 12 13 14 15 16 17 18 19 20 21 22 23 24 25 26 27 28 29 30 31 32 33 34 35 36 37 38 39 40 41 42 43 44 45 46 47 48 49 50 51 52 53 54 55 56 57 58 59 60 61 62 63 64 65 66 67 68 69 70 71 72 73 74 75 76 77 78 79 80 81 82 83 84 85 86 87 88 89 90 91 92 93 94 95 96 97 98 99 100 101 102 103 104 105 106 107 108 109 110 111 112 113 114 115 116 117 118 119 120 121 122 123 124 125 126 127 128 129 130 131 132 133 134 135 136 137 138 139 140 141 142 143 144 145 146 147 148 149 150 151 152 153 154 155 156 157 158 159 160 161 162 163 164 165 166 167 168 169 170 171 172 173 174 |
using System.Collections; using System.Collections.Generic; using UnityEngine; using UnityEngine.UI; public class UIManager : MonoBehaviour { [HeaderAttribute("UI bits")] public int Score; public Text ScoreBox; public int Health; public Text HealthBox; public int Wave; public Text WaveNo; public int FinalScore; public Text FinaleScoreText; [HeaderAttribute("UIs and States")] public int GameState; public Canvas MainMenu,InGame,UpgradeMenu,EndGameMenu; private GameObject PlayerManager; [HeaderAttribute("UpgradeStuff")] public Text CurrentScoreText; public int CurrentLength; public Text CurrentLengthText; public Text CurrentLengthCost; public Button BuyLength; public int CurrentGirth; public Text CurrentGirthText; public Text CurrentGirthCost; public Button BuyGirth; public int CurrentHealth; public Text CurrentHealthText; public Text CurrentHealthCost; public Button BuyHealth; [HeaderAttribute("UpgradeAmounts")] public int healthAmount; public int healthCost; public int additionalHealthCost; public int lengthAmount; public int lengthCost; public int additionalLengthCost; public int girthAmount; public int girthCost; public int additionalGirthCost; // Start is called before the first frame update void Start() { PlayerManager = GameObject.Find("Player"); MainMenu.enabled = false; InGame.enabled = false; UpgradeMenu.enabled = false; EndGameMenu.enabled = false; } // Update is called once per frame void Update() { Health = GameObject.Find("Player").GetComponent<PlayerManager>().Health; ScoreBox.text = "SCORE : "+ Score.ToString(); HealthBox.text = "HEALTH : "+ Health.ToString(); WaveNo.text = "WAVE : " + Wave.ToString(); FinaleScoreText.text = "Your final score was: " + FinalScore.ToString(); switch (GameState) { case 0: //Main Menu MainMenu.enabled = true; InGame.enabled = false; UpgradeMenu.enabled = false; EndGameMenu.enabled = false; PlayerManager.GetComponent<MouseMove>().enabled = false; break; case 1: //InGame MainMenu.enabled = false; InGame.enabled = true; UpgradeMenu.enabled = false; EndGameMenu.enabled = false; PlayerManager.GetComponent<MouseMove>().enabled = true; break; case 2: //Upgrade/EndWave MainMenu.enabled = false; InGame.enabled = false; UpgradeMenu.enabled = true; EndGameMenu.enabled = false; PlayerManager.GetComponent<MouseMove>().enabled = false; break; case 3: //EndGame MainMenu.enabled = false; InGame.enabled = false; UpgradeMenu.enabled = false; EndGameMenu.enabled = true; PlayerManager.GetComponent<MouseMove>().enabled = false; break; } //UpgradeStuff CurrentLengthText.text = "Current Length : " + CurrentLength.ToString(); CurrentGirthText.text = "Current Girth : " + CurrentGirth.ToString(); CurrentHealthText.text = "Current Health : " + PlayerManager.GetComponent<PlayerManager>().Health.ToString(); CurrentScoreText.text = "SCORE : "+ Score.ToString(); CurrentLengthCost.text = "Cost : " + lengthCost.ToString(); CurrentGirthCost.text = "Cost : " + girthCost.ToString(); CurrentHealthCost.text = "Cost : " + healthCost.ToString(); if (healthCost > Score) { BuyHealth.interactable = false; } else { BuyHealth.interactable = true; } if (lengthCost > Score) { BuyLength.interactable = false; } else { BuyLength.interactable = true; } if (girthCost > Score) { BuyGirth.interactable = false; } else { BuyGirth.interactable = true; } } public void ResetUpgrades() { CurrentLength = 1; CurrentGirth = 1; healthCost = 10; lengthCost = 10; girthCost = 10; } public void AddHealth() { Score = Score - healthCost; healthCost = healthCost + additionalHealthCost; PlayerManager.GetComponent<PlayerManager>().Health = PlayerManager.GetComponent<PlayerManager>().Health + healthAmount; } public void AddLength() { Score = Score - lengthCost; lengthCost = lengthCost + additionalLengthCost; CurrentLength++; PlayerManager.GetComponent<PlayerManager>().IncreaseLength(); } public void AddGirth() { Score = Score - girthCost; girthCost = girthCost + additionalGirthCost; CurrentGirth++; PlayerManager.GetComponent<PlayerManager>().IncreaseGirth(); } } |
Alongside this the game needed to have some functions thrown in to the PlayerManager and the GameManager to handle everything, so these ended up looking like this.
|
1 2 3 4 5 6 7 8 9 10 11 12 13 14 15 16 17 18 19 20 21 22 23 24 25 26 27 28 29 30 31 32 33 34 35 36 37 38 39 40 41 |
using System.Collections; using System.Collections.Generic; using UnityEngine; public class PlayerManager : MonoBehaviour { public int Health; public GameObject ShadowObject; public float IncreaseAmount; // Start is called before the first frame update void Start() { } // Update is called once per frame void Update() { if (Health == 0) { GameObject.Find("GameManager").GetComponent<GameManager>().Death(); } } public void IncreaseLength(){ ShadowObject.transform.localScale = ShadowObject.transform.localScale + new Vector3 (0, IncreaseAmount, 0); } public void IncreaseGirth(){ ShadowObject.transform.localScale = ShadowObject.transform.localScale + new Vector3 (IncreaseAmount, 0, 0); } } |
|
1 2 3 4 5 6 7 8 9 10 11 12 13 14 15 16 17 18 19 20 21 22 23 24 25 26 27 28 29 30 31 32 33 34 35 36 37 38 39 40 41 42 43 44 45 46 47 48 49 50 51 52 53 54 55 56 57 58 59 60 61 62 63 64 65 66 67 68 69 70 71 72 73 74 75 76 77 78 79 80 81 82 83 84 85 86 87 88 89 90 91 92 93 94 95 96 97 98 99 100 101 102 103 104 105 106 107 108 109 110 111 112 113 114 115 116 117 118 119 120 121 122 123 124 125 126 127 128 129 130 131 132 133 134 135 136 137 138 |
using UnityEngine; using System.Collections; public class GameManager : MonoBehaviour { [HeaderAttribute("Wave Stuff")] public int EnemyAmount; public int CurrentEnemyAmount; public int EnemyIncrease; public int CurrentWaveAmount; public bool WaveActive; [HeaderAttribute("Prefab Stuff")] public GameObject prefab; private GameObject UIManager; private GameObject PlayerManager; private Coroutine SpawnWaveRoute; public AudioSource StartGame; public AudioSource YouWin; public AudioSource YouLose; public AudioSource[] DeathSFX; public AudioSource PlayerHit; void Start() { UIManager = GameObject.Find("UIManager"); PlayerManager = GameObject.Find("Player"); } Vector3 RandomCircle ( Vector3 center , float radius ){ float ang = Random.value * 360; Vector3 pos; pos.x = center.x + radius * Mathf.Sin(ang * Mathf.Deg2Rad); pos.y = center.y; pos.z = center.z + radius * Mathf.Cos(ang * Mathf.Deg2Rad); return pos; } IEnumerator SpawnWave() { Vector3 center = transform.position; for (int i = 0; i < EnemyAmount; i++){ Vector3 pos = RandomCircle(center, 20.0f); Quaternion rot = Quaternion.FromToRotation(Vector3.forward, center-pos); Instantiate(prefab, pos, rot); CurrentWaveAmount++; yield return new WaitForSeconds(0.5f); } } void Update() { if (WaveActive == true && CurrentWaveAmount == 0) { FireEndWave(); } //RobsCheatCodes if (Input.GetKeyDown(KeyCode.M)) { UIManager.GetComponent<UIManager>().Score = UIManager.GetComponent<UIManager>().Score + 1000; } if (Input.GetKeyDown(KeyCode.K)) { PlayerManager.GetComponent<PlayerManager>().Health --; } if (Input.GetKeyDown(KeyCode.L)) { EnemyAmount = EnemyAmount + 100; } } public void StartGameButton(){ EnemyAmount = CurrentEnemyAmount; SpawnWaveRoute = StartCoroutine(SpawnWave()); UIManager.GetComponent<UIManager>().GameState = 1; PlayerManager.GetComponent<PlayerManager>().Health = 10; UIManager.GetComponent<UIManager>().Score = 0; UIManager.GetComponent<UIManager>().Wave ++; UIManager.GetComponent<UIManager>().ResetUpgrades(); StartGame.Play(); WaveActive = true; } public void StartNextWave(){ EnemyAmount = CurrentEnemyAmount; SpawnWaveRoute = StartCoroutine(SpawnWave()); UIManager.GetComponent<UIManager>().GameState = 1; UIManager.GetComponent<UIManager>().Wave ++; WaveActive = true; } void FireEndWave() { WaveActive = false; UIManager.GetComponent<UIManager>().GameState = 2; CurrentEnemyAmount = CurrentEnemyAmount + EnemyIncrease; YouWin.Play(); GameObject[] bloodTemp; bloodTemp = GameObject.FindGameObjectsWithTag("Blood"); for (int i = 0; i < bloodTemp.Length; i++) { Destroy(bloodTemp[i]); } } public void Death() { WaveActive = false; StopCoroutine(SpawnWaveRoute); UIManager.GetComponent<UIManager>().GameState = 3; PlayerManager.GetComponent<PlayerManager>().Health = 1; UIManager.GetComponent<UIManager>().Wave = 0; UIManager.GetComponent<UIManager>().FinalScore = UIManager.GetComponent<UIManager>().Score; CurrentEnemyAmount = 10; CurrentWaveAmount = 0; GameObject[] enemyTemp; YouLose.Play(); enemyTemp = GameObject.FindGameObjectsWithTag("Enemy"); for (int i = 0; i < enemyTemp.Length; i++) { Destroy(enemyTemp[i]); } GameObject[] bloodTemp; bloodTemp = GameObject.FindGameObjectsWithTag("Blood"); for (int i = 0; i < bloodTemp.Length; i++) { Destroy(bloodTemp[i]); } } } |
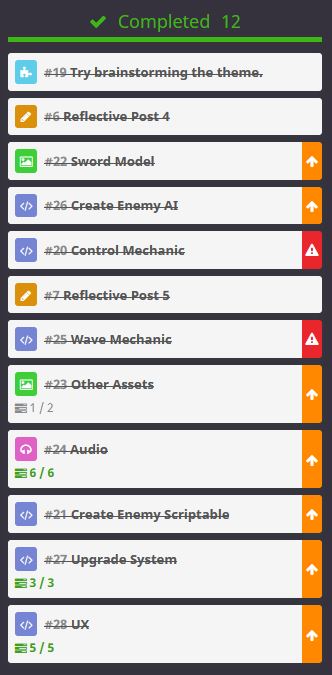
Obviously as you can see this includes all of the sounds and particle effects that I put in to give better feedback and experience to the player. Basically I went back to following my project management and got it finished the way I wanted, there was one job I did not need to do anymore so I discarded this. But in the end this is what the project management looked like.
So that was it, the game was done. I was due to show it to the group two days later so I had to make sure that I did not slip into my usual behavior of going in one last time and tweaking something and totally breaking it. I managed to do this, I stayed away from it and just let it sit there.
And in the end this is what I ended up with.
References
Synty Store. 2021. POLYGON – Sci-Fi City Pack. [online] Available at: <https://syntystore.com/products/polygon-sci-fi-city?_pos=1&_sid=164185ee6&_ss=r> [Accessed 1 July 2021].
Synty Store. 2021. POLYGON Prototype Pack. [online] Available at: <https://syntystore.com/products/polygon-prototype-pack?_pos=1&_sid=b73bc5486&_ss=r> [Accessed 1 July 2021].
Synty Store. 2021. POLYGON – Knights Pack. [online] Synty Store. Available at: <https://syntystore.com/products/polygon-knights-pack?_pos=1&_sid=c02b004ad&_ss=r> [Accessed 1 July 2021].
Synty Store. 2021. POLYGON – Apocalypse Pack. [online] Available at: <https://syntystore.com/products/polygon-apocalypse-pack?_pos=1&_sid=40db72e5b&_ss=r> [Accessed 1 July 2021].
Lousberg, K., 2021. KayKit – Dungeon Pack by Kay Lousberg. [online] itch.io. Available at: <https://kaylousberg.itch.io/kaykit-dungeon> [Accessed 1 July 2021].
Kenney.nl. 2021. Kenney • Voiceover Pack: Fighter. [online] Available at: <https://kenney.nl/assets/voiceover-pack-fighter> [Accessed 1 July 2021].
OpenGameArt.org. 2021. RPG Sound Pack. [online] Available at: <https://opengameart.org/content/rpg-sound-pack> [Accessed 1 July 2021].
Tabletopaudio.com. 2021. Tabletop Audio – Premium Ambient Audio. [online] Available at: <https://tabletopaudio.com/> [Accessed 1 July 2021].
Farrajota Ramos, D., 2020. Change pivot or local origin of an object. [online] Blender Stack Exchange. Available at: <https://blender.stackexchange.com/questions/1291/change-pivot-or-local-origin-of-an-object> [Accessed 1 July 2021].
Unity. 2021. Some of the best optimization tips for Unity UI – Unity. [online] Available at: <https://unity3d.com/how-to/unity-ui-optimization-tips> [Accessed 2 July 2021].
Figures
Feature Image: Charlish, R (2021) ‘Shadow Sword logo’ Created on July 9th 2021
Figure 1: Charlish, R (2021) ‘Conscious decision making’ Created on July 9th 2021
Figure 2: Charlish, R (2021) ‘Incorrect sword scaling’ Created on July 9th 2021
Figure 3: Charlish, R (2021) ‘Fixed sword scaling’ Created on July 9th 2021
Figure 4: Charlish, R (2021) ‘Finished UI Manager’ Created on July 9th 2021
Figure 5: Charlish, R (2021) ‘Completed Project Management’ Created on July 9th 2021


0 Comments